
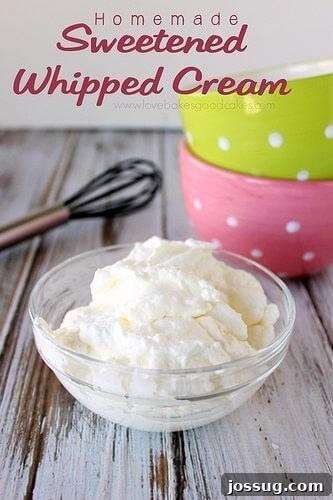
Welcome to the delightful world of homemade culinary creations, where simplicity meets incredible flavor. Today, we’re diving into a kitchen essential that promises to elevate nearly every dessert you can imagine: Homemade Sweetened Whipped Cream. Forget the aerosol cans and plastic tubs from the store – once you experience the rich, creamy texture and pure taste of fresh whipped cream made from scratch, there’s truly no turning back. This isn’t just a recipe; it’s a game-changer for anyone who loves baking and wants to add that perfect, elegant touch to their sweet treats.
Homemade Sweetened Whipped Cream: The Ultimate Dessert Topping
Making your own sweetened whipped cream is not only incredibly straightforward but also remarkably quick. With just two simple ingredients and a few minutes of your time, you can create a topping that is far superior in taste and texture to anything mass-produced. There are no mysterious additives, no stabilizers, just pure, fresh cream and a touch of sweetness. This recipe is a testament to the fact that sometimes, the best things in life are indeed the simplest.
Why Choose Homemade Over Store-Bought?
The difference between homemade and store-bought whipped cream is truly night and day. Canned whipped cream often contains emulsifiers, propellants, and artificial flavors that detract from the natural richness of dairy. Tubs of “whipped topping” often substitute actual cream for hydrogenated oils and corn syrup, resulting in a waxy texture and an artificial aftertaste.
- Superior Taste: Homemade whipped cream boasts a pure, rich dairy flavor that perfectly complements any dessert.
- Creamy Texture: Achieving the perfect balance of airy lightness and decadent creaminess is effortless at home.
- No Unwanted Additives: You control what goes into it – just wholesome ingredients, free from artificial flavors, preservatives, or unnecessary chemicals.
- Cost-Effective: Heavy whipping cream is generally more economical than specialty whipped toppings, especially when you consider the quality difference.
- Customization: Easily adjust the level of sweetness or infuse it with additional flavors like vanilla, almond, or even a hint of liqueur.
The Essential Ingredients for Perfect Whipped Cream
The beauty of this recipe lies in its minimal ingredient list. You only need two items, but choosing the right ones can make all the difference in achieving that perfect fluffy consistency and delectable flavor. Quality matters, even for the simplest of recipes.
- Heavy Whipping Cream: This is the star of the show. Look for “heavy cream” or “heavy whipping cream” with a milk fat content of 36% or higher. Lower fat creams (like “light cream” or “half-and-half”) simply won’t whip to the same volume or stability. Ensure your cream is very cold, straight from the refrigerator, as cold fat molecules are essential for whipping successfully.
- Granulated or Powdered Sugar: Both work beautifully, and your choice depends on your preference for texture.
- Powdered Sugar (Confectioners’ Sugar): My personal preference, as it dissolves instantly and helps stabilize the whipped cream, giving it a slightly smoother, more refined texture.
- Granulated Sugar: Works just as well, providing sweetness. Just ensure it dissolves fully during the beating process to avoid a grainy texture.
- Optional (but Highly Recommended) – Vanilla Extract: A splash of pure vanilla extract adds a wonderful depth of flavor that takes your whipped cream from great to extraordinary. You can also experiment with other extracts like almond, peppermint, or even a touch of orange zest for different dessert pairings.
Step-by-Step Guide: Crafting Your Perfect Whipped Cream
Homemade Sweetened Whipped Cream
By Jamie Sherman
This Sweetened Whipped Cream is an absolute favorite topping for countless desserts. It’s incredibly simple to prepare at home with just two core ingredients, delivering a fresh, luxurious taste that store-bought versions simply can’t match.
Servings: 4 servings
Prep Time: 5 mins
Total Time: 20 mins (includes chilling time)
Ingredients
- ½ cup heavy whipping cream (very cold)
- 1 tablespoon granulated or powdered sugar
- (Optional) ¼ teaspoon pure vanilla extract
Instructions
- Chill Your Equipment: Place a medium-sized mixing bowl (preferably metal or glass) and your electric mixer beaters in the freezer for at least 15-20 minutes. This crucial step helps the cream whip up faster and achieve a more stable consistency.
- Combine Ingredients: Once your bowl and beaters are thoroughly chilled, remove them from the freezer. Pour the very cold heavy whipping cream into the chilled bowl. Add the granulated or powdered sugar (and vanilla extract, if using).
- Whip to Perfection: Using your electric mixer on high speed, begin to beat the cream mixture. Start slowly to avoid splashing, then increase to high. Continue beating until the cream thickens and forms stiff peaks. Stiff peaks mean that when you lift the beaters from the cream, the peaks stand up straight without drooping. Be vigilant during this stage, as it can go from perfect to over-beaten (butter!) very quickly.
- Serve Immediately or Store: Your Homemade Sweetened Whipped Cream is now ready to use! Dollop it generously over your favorite desserts, hot beverages, or fresh fruit.
Notes
- Sugar Choice: While granulated sugar works, powdered sugar (confectioners’ sugar) is often preferred as it dissolves more easily, resulting in a smoother texture.
- Flavor Boost: For an extra special touch, don’t hesitate to add ¼ teaspoon of vanilla extract. Other extracts like almond or a zest of citrus can also be lovely additions depending on your dessert.
- Avoid Over-Beating: Pay close attention when whipping. If you beat the cream for too long, the fat molecules will begin to separate, and you’ll end up with butter instead of fluffy whipped cream. It happens quickly, so stop as soon as stiff peaks are formed.
- No Electric Mixer? No Problem!: If you don’t have an electric mixer, a balloon whisk and a bit of arm power will do the trick. It requires more effort and time, but it’s absolutely achievable. Ensure your bowl and cream are very cold to assist in the process.
Nutrition Information
Serving: 0.25 cup, Calories: 113kcal, Carbohydrates: 4g, Protein: 1g, Fat: 11g, Saturated Fat: 7g, Polyunsaturated Fat: 0.5g, Monounsaturated Fat: 3g, Cholesterol: 34mg, Sodium: 8mg, Potassium: 28mg, Sugar: 4g, Vitamin A: 437IU, Vitamin C: 0.2mg, Calcium: 20mg, Iron: 0.03mg
Nutrition information is automatically calculated and should only be used as an approximation.
Perfect Pairings and Serving Ideas
The versatility of homemade sweetened whipped cream is one of its greatest assets. It’s not just for pie; it’s a universal enhancer for almost any sweet creation. Here are just a few ideas to inspire you:
- Classic Desserts: Top off a slice of Strawberry Shortcake, a warm apple pie, pumpkin pie, pecan pie, or a rich chocolate torte.
- Fruits: A simple bowl of fresh berries (strawberries, blueberries, raspberries) becomes an elegant dessert with a generous dollop of whipped cream. Sliced peaches or bananas also pair wonderfully.
- Beverages: Elevate your hot cocoa, coffee drinks, or iced lattes with a swirl of fresh cream. It’s far superior to any canned variety.
- Breakfast & Brunch: Serve it alongside pancakes, waffles, French toast, or crepes for a special weekend treat.
- Puddings & Custards: A perfect finish for chocolate mousse, crème brûlée, or a simple vanilla pudding.
- Cakes & Cupcakes: Use it as a lighter frosting or filling for cakes and cupcakes, especially those with fruit or chocolate flavors.
Storage and Troubleshooting Tips
To ensure your homemade whipped cream stays delightful:
- Storage: Store any leftover whipped cream in an airtight container in the refrigerator for up to 2-3 days. It may lose some of its volume over time, but it will still taste delicious. Gently re-whisk for a few seconds if it needs a boost in fluffiness before serving.
- Runny Whipped Cream: If your cream isn’t whipping, it’s likely not cold enough. Pop the bowl and cream back into the freezer for another 10-15 minutes, then try again. Ensure you’re using heavy whipping cream (at least 36% fat content).
- Over-Beaten Whipped Cream: If you’ve gone too far and it starts to look chunky or separates, you’ve made butter! Unfortunately, there’s no going back to whipped cream from this point. Your best bet is to start over with fresh, cold cream. Don’t worry, it happens to the best of us!
Frequently Asked Questions About Homemade Whipped Cream
- Can I make whipped cream ahead of time?
- While best served fresh, you can make whipped cream 1-2 days in advance. Adding a small amount of powdered sugar helps stabilize it, keeping it fluffier for longer. Re-whisk briefly before serving if needed.
- What if I don’t have an electric mixer?
- A sturdy balloon whisk and some elbow grease work perfectly! Ensure your bowl is chilled to aid the process. It might take 5-10 minutes of continuous whisking by hand.
- Can I make sugar-free whipped cream?
- Absolutely! Simply substitute the granulated or powdered sugar with your preferred sugar substitute (e.g., erythritol, stevia blend) to taste.
Making sweetened whipped cream at home is one of those simple kitchen victories that brings immense satisfaction. It’s a skill that pays dividends, transforming ordinary desserts into extraordinary experiences. So, grab your heavy cream, chill your bowl, and get ready to whip up a batch of pure, creamy bliss!
Other Delicious Recipes to Try
If you enjoyed this simple yet essential recipe, you might also like to explore these other delightful treats:
- Five Layer Bars
- Creamy Lemonade
- Chocolate Strawberry Shortcake
- Magic Cookie Bars
- Simple Syrup
Originally published on March 18, 2014. Updated on April 26, 2021.