

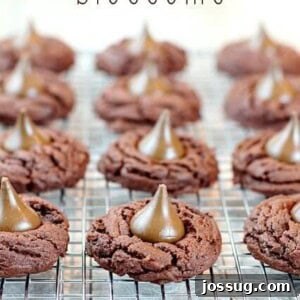
Dive into the delightful world of Chocolate Blossoms – soft, rich chocolate cookies adorned with a classic Hershey’s Kiss candy in the middle. These iconic treats are a must-have for any cookie lover!
The Irresistible Allure of Chocolate Blossoms
There are some cookie recipes that simply stand the test of time, becoming cherished staples in kitchens everywhere. Chocolate Blossoms are undoubtedly one of them. These delightful cookies are celebrated for their wonderfully soft and chewy texture, deep chocolate flavor, and the signature melt-in-your-mouth Hershey’s Kiss nestled perfectly in the center. They’re more than just a dessert; they’re a symbol of comfort, nostalgia, and homemade goodness, making them an ideal choice for holiday gatherings, family celebrations, or simply a cozy evening treat.
What makes these chocolate blossom cookies truly special is their universal appeal. Kids adore them for the surprise chocolate kiss, while adults appreciate the rich flavor and satisfying texture. Whether you’re a seasoned baker or just starting your culinary journey, this recipe is designed to be straightforward and rewarding, promising a batch of beautiful, delicious cookies every single time. It’s one of those quick and easy recipes everyone should have readily available for those moments when a sweet craving strikes or an unexpected guest arrives.
36
cookies
Chocolate Blossoms
Jamie Sherman
20
10
30
Print Recipe
Want to save this recipe?
Enter your email below to receive this recipe directly in your inbox, so you can easily come back to it later!
Ingredients
- ¾ cup butter, softened
- ½ cup Nutella
- ½ cup granulated sugar
- ½ cup brown sugar
- 2 large eggs
- 1 teaspoon vanilla extract
- ¼ cup cocoa powder
- 2 ¼ cups all-purpose flour
- 1 teaspoon baking soda
- ½ teaspoon salt
- 1 box instant chocolate pudding mix, 3.4 oz.
- 1 bag Hershey’s Kisses Brand Milk Chocolate, 12 oz.
Instructions
-
In a medium bowl, cream the butter, Nutella (or Hershey’s Spread if you prefer), granulated sugar, and brown sugar with an electric mixer until thoroughly combined and fluffy. Add the eggs and vanilla extract; mix well until fully incorporated.
-
In a separate medium bowl, whisk together the cocoa powder, all-purpose flour, baking soda, salt, and instant pudding mix. Gradually add the dry ingredients to the creamed wet mixture, mixing until just combined. Be careful not to overmix. Cover the dough and chill it in the refrigerator for at least 30 minutes. This step is crucial for better cookie texture and easier handling.
-
Preheat your oven to 350°F (175°C). Line baking sheets with parchment paper or Silpat mats to prevent sticking and ensure even baking. Roll the chilled dough into 1-inch balls. For a classic look, you can also roll the dough balls in granulated sugar before placing them onto the prepared baking sheets, leaving a couple of inches between each cookie for spreading.
-
Bake for 8-10 minutes, or until the edges are set but the centers are still slightly soft. Remove the baking sheets from the oven. Immediately and gently press one unwrapped Hershey’s Kiss onto the center of each warm cookie. The residual heat will soften the chocolate kiss, allowing it to meld perfectly into the cookie. Allow the cookies to cool on the baking sheet for about 2 minutes before transferring them to a wire rack to cool completely. This helps them set and prevents breakage.
-
Once completely cooled, store the chocolate blossom cookies in an airtight covered container at room temperature to maintain their freshness and soft texture.
Notes
- Yes, feel free to use peanut butter in place of Nutella for the classic peanut butter blossom cookie!
- For an extra festive touch, roll the dough balls in colored sprinkles or coarse sugar before baking.
- Ensure your butter is truly softened (but not melted) and eggs are at room temperature for the best dough consistency.
Nutrition
Calories: 123kcal
,
Carbohydrates: 17g
,
Protein: 2g
,
Fat: 6g
,
Saturated Fat: 4g
,
Polyunsaturated Fat: 0.2g
,
Monounsaturated Fat: 1g
,
Trans Fat: 0.2g
,
Cholesterol: 21mg
,
Sodium: 138mg
,
Potassium: 50mg
,
Fiber: 1g
,
Sugar: 10g
,
Vitamin A: 133IU
,
Calcium: 12mg
,
Iron: 1mg
Nutrition information is automatically calculated, so should only be used as an approximation.
A Bit of Cookie History: From Peanut Butter to Chocolate Perfection
The concept of a “blossom” cookie, characterized by a soft, round cookie with a chocolate candy pressed into its center, dates back to the mid-20th century. The original and perhaps most famous version is the Peanut Butter Blossom, first popularized by Mrs. Freda Smith of Gibsonburg, Ohio, who submitted her recipe to the Pillsbury Bake-Off Contest in 1957. Her ingenious idea of adding a Hershey’s Kiss to a peanut butter cookie quickly captured the hearts (and taste buds) of America.
It wasn’t long before creative bakers began experimenting with other flavors, leading to the emergence of the Chocolate Blossom. By swapping out the peanut butter for a rich chocolate dough, a new classic was born – one that offers a double dose of chocolatey goodness. The chocolate version retains the beloved soft texture and the satisfying moment of biting into the creamy chocolate kiss, but with an intensified cocoa flavor that appeals to true chocolate aficionados. These cookies have since become a festive favorite, especially during the Christmas season, and are a welcome addition to any dessert platter year-round.
Mastering Your Blossom Cookies: Tips and Tricks for Success
While Chocolate Blossoms are relatively easy to make, a few key tips can elevate your baking experience and ensure perfect results every time:
- Ingredient Temperature is Key: Always ensure your butter is properly softened to room temperature, but not melted. This allows it to cream smoothly with the sugars, creating a light and airy base for your cookie dough. Similarly, room temperature eggs emulsify better with the fat, leading to a more uniform dough and softer cookies.
- Don’t Skip the Chill Time: Chilling the cookie dough for at least 30 minutes is a crucial step. It helps the dough firm up, making it much easier to roll into balls. More importantly, chilling prevents the cookies from spreading too much in the oven, ensuring they maintain their shape and that delightful chewiness.
- Uniformity in Rolling: Try to roll your dough into consistently sized 1-inch balls. This ensures that all cookies bake evenly. A small cookie scoop can be a great tool for this, producing perfectly round and uniform cookies.
- Timing the Hershey’s Kiss: The moment you press the Hershey’s Kiss into the hot cookie is critical. Do it immediately after removing the cookies from the oven. The residual heat will gently melt the base of the chocolate, allowing it to adhere and become beautifully soft without completely losing its shape. If you wait too long, the cookies will start to set, and the Kisses won’t stick or melt as nicely.
- Cooling Process: Allow the cookies to cool on the baking sheet for a couple of minutes before transferring them to a wire rack. This brief period on the hot pan helps them firm up enough to be moved without breaking, especially with the soft chocolate kiss on top.
Creative Variations and Serving Suggestions
One of the joys of baking Chocolate Blossom cookies is how adaptable they are. While the classic recipe is perfect on its own, don’t hesitate to get creative:
- Peanut Butter Swap: As mentioned in the notes, easily revert to the classic peanut butter blossom by replacing Nutella (or Hershey’s Spread) with ½ cup of creamy peanut butter in the dough. You might also omit the cocoa powder for a true peanut butter experience.
- Different Kisses: Experiment with various Hershey’s Kiss flavors! Dark chocolate Kisses will intensify the chocolate flavor, while caramel-filled or almond Kisses can add an exciting new dimension. White chocolate Kisses would offer a beautiful visual contrast.
- Textural Enhancements: Before baking, roll your dough balls in coarse sanding sugar for a sparkling, crunchy exterior, or in colorful sprinkles for a festive touch, especially during holidays.
- Double Chocolate Delight: Add ½ cup of mini chocolate chips to the cookie dough along with the dry ingredients for an even richer chocolate experience.
- Spice It Up: A pinch of cinnamon or a tiny dash of cayenne pepper can add a subtle warmth and complexity to the chocolate dough.
Serving Your Delicious Blossoms
These chocolate blossom cookies are incredibly versatile for serving. They are a fantastic addition to any cookie platter, perfect for potlucks, bake sales, or gift baskets. For a simple yet satisfying treat, pair them with a tall glass of cold milk, a warm cup of coffee, or a scoop of vanilla bean ice cream for an ultimate dessert experience. During colder months, they are particularly comforting with hot cocoa or spiced cider.
Frequently Asked Questions About Chocolate Blossom Cookies
Here are answers to some common questions about making these delightful cookies:
- Can I make the dough ahead of time? Yes! The dough can be prepared and stored in an airtight container in the refrigerator for up to 2-3 days. This is perfect for party prep or when you want fresh cookies on demand. You can also freeze the dough balls for up to 3 months; just thaw slightly before baking.
- How long do Chocolate Blossoms stay fresh? When stored in an airtight container at room temperature, these cookies will remain soft and delicious for up to 5-7 days.
- What if my Hershey’s Kisses melt completely? This usually happens if the cookies are overbaked, or if the oven temperature is too high. Ensure you bake for just 8-10 minutes. The cookies should still be slightly soft in the center when you remove them. Using Kisses straight from the refrigerator can also help them hold their shape better.
- Can I use other chocolate candies instead of Hershey’s Kisses? Absolutely! While Hershey’s Kisses are traditional, you can certainly experiment with other small, unwrapped chocolate candies like mini peanut butter cups, Rolos, or even squares of your favorite chocolate bar. Just be aware that different chocolates might melt differently.
- Why is my dough sticky? A sticky dough could be due to not enough flour (make sure to measure correctly) or if your butter was too warm. Chilling the dough adequately is usually the best solution for stickiness.
Enjoyed this recipe? Share your thoughts below!
We’d love to hear from you.
Originally published on May 19, 2014. Updated on April 27, 2021, and further enhanced for clarity and SEO on [Current Date].