
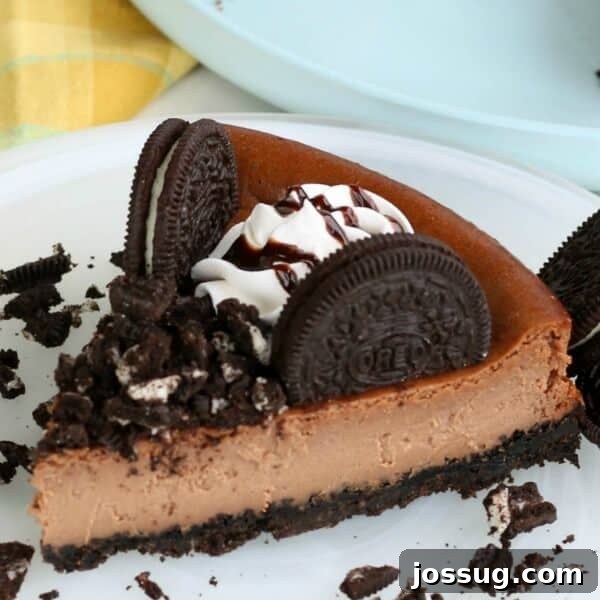
Prepare yourself for a truly unforgettable dessert experience with our **Chocolate Bliss Cheesecake**. This recipe delivers a perfectly rich, incredibly creamy, and utterly decadent chocolate cheesecake that will undoubtedly become your new go-to. Having perfected this recipe over two decades and countless gatherings, I can confidently call it my “fall-back” cheesecake – a guaranteed crowd-pleaser that never disappoints. It’s a testament to simple elegance, offering pure chocolate indulgence in every bite.

Decadent Chocolate Bliss Cheesecake: Your New Go-To Dessert
For more than twenty years, this chocolate cheesecake recipe has been a staple in my kitchen, prepared well over a hundred times for everything from intimate family dinners to grand celebrations. Its popularity is undeniable; it disappears quickly at every event, and I’m constantly sharing the recipe with eager friends and family. Now, it’s your turn to join the ranks of those who have fallen in love with this extraordinary dessert. Whether you’re a seasoned baker or new to the world of cheesecakes, this recipe is designed for success.

Why This Chocolate Bliss Cheesecake is Uniquely Foolproof and Delicious
One of the most appealing aspects of this chocolate cheesecake recipe is its remarkable ease. Many home bakers find the idea of making a cheesecake intimidating, often fearing cracks or a rubbery texture. Rest assured, this recipe is designed to be almost foolproof, making it an excellent starting point for beginners while still impressing even the most discerning dessert connoisseurs. Its consistent creamy, rich, and intensely chocolatey flavor profile is simply divine.
Forget the stress about minor imperfections! I’m a firm believer that a homemade cheesecake’s beauty lies in its authentic charm, not in absolute perfection. Should any small cracks appear – which are rare with this recipe – they are effortlessly hidden and even enhanced with a simple decoration. A swirl of fresh whipped cream, a scattering of chocolate cookies, or a vibrant burst of fresh berries can transform any tiny flaw into an intentional flourish, adding to the visual appeal. This approach encourages a relaxed baking experience, allowing you to focus on the joy of creating something truly special.


Essential Ingredients for Your Chocolate Bliss Cheesecake
Crafting this incredible chocolate cheesecake requires a selection of high-quality ingredients that work in harmony to create its signature rich and creamy texture. Using good quality ingredients will elevate the flavor significantly. Here’s what you’ll need to gather:
- OREO Cookies: Approximately 18 finely crushed cookies, yielding about 1½ cups. These form the perfectly sweet and crunchy base that complements the rich chocolate filling. For best results, use a food processor to get consistently fine crumbs.
- Unsalted Butter: 2 tablespoons, melted. This binds the cookie crumbs together for a sturdy and flavorful crust. Unsalted butter allows you to control the overall sodium content.
- Cream Cheese: 3 packages (8 oz each), softened. Full-fat cream cheese is crucial here for achieving the signature dense, smooth, and tangy cheesecake texture. Ensure it’s at room temperature for easy blending and to prevent lumps.
- Granulated Sugar: ¾ cup. Provides the perfect level of sweetness without overwhelming the chocolate.
- Vanilla Extract: 1 teaspoon. A touch of vanilla enhances the chocolate flavor and adds a warm aromatic note to the cheesecake. Use pure vanilla extract for the best taste.
- BAKER’S Semi-Sweet Chocolate: 1 package (8 squares), melted and slightly cooled. This is the heart of our chocolate bliss. Semi-sweet chocolate provides a deep, balanced cocoa flavor that isn’t overly bitter or too sweet. Ensure it’s slightly cooled after melting to prevent curdling the eggs.
- Large Eggs: 3 large eggs. Eggs are essential for binding the cheesecake filling and giving it structure. Make sure they are at room temperature, just like the cream cheese, for a smoother batter.

How to Make Your Divine Chocolate Bliss Cheesecake: Step-by-Step Instructions
Follow these straightforward steps to create a show-stopping chocolate cheesecake that will impress everyone.
- Prepare Your Oven and Pan: Preheat your oven to 325°F (160°C). This ensures the oven is at the correct temperature for even baking. For the pan, a 9-inch springform pan is essential. The removable sides make it incredibly easy to release the delicate cheesecake without damaging it.
- Craft the Oreo Crust: In a medium-sized bowl, combine the finely crushed OREO cookies with the melted unsalted butter. Mix thoroughly until the crumbs are evenly moistened. Press this mixture firmly and evenly onto the bottom of your 9-inch springform pan. Use the back of a spoon or your fingers to create a compact, uniform crust. This forms the delicious foundation for your cheesecake.
- Create the Creamy Chocolate Filling: In a large mixing bowl, using an electric mixer, beat the softened cream cheese, granulated sugar, and vanilla extract until the mixture is completely smooth and well blended. Scrape down the sides of the bowl as needed to ensure everything is incorporated. Next, gently fold in the melted and slightly cooled semi-sweet chocolate, mixing just until combined. Be careful not to overmix at this stage. Finally, add the large eggs, one at a time, mixing at a low speed just until each egg is blended into the batter. Overmixing the eggs can introduce too much air, which can sometimes lead to cracks during baking.
- Bake to Perfection: Pour the luscious chocolate cheesecake mixture evenly over your prepared Oreo crust in the springform pan. Place the pan in the preheated oven and bake for approximately 55-60 minutes. The cheesecake is ready when the edges are set and slightly puffed, but the center still has a slight jiggle when gently shaken. This “almost set” consistency is key to a creamy finished product.
- Cool and Chill: Once baked, carefully remove the cheesecake from the oven. Immediately run a thin knife around the rim of the pan to loosen the cake from the sides. This crucial step helps prevent cracks as the cheesecake cools and contracts. Let the cheesecake cool completely on a wire rack on your counter for about 2 hours. After it has reached room temperature, transfer it to the refrigerator and chill for at least 4 hours, or ideally overnight. Chilling is vital for the cheesecake to firm up, develop its full flavor, and achieve that perfect creamy consistency. Store any leftovers tightly covered in the refrigerator.

Chocolate Bliss Cheesecake: Frequently Asked Questions (FAQs)
Have questions about making, storing, or serving your Chocolate Bliss Cheesecake? We’ve got you covered with answers to some common queries.
- Can cheesecake be frozen?
Absolutely! Freezing cheesecake is an excellent way to extend its shelf life and enjoy it later. Ensure the cheesecake is completely cooled before freezing. You have two main options:- Individual Slices: For convenient single servings, wrap individual slices tightly in plastic wrap, then again in aluminum foil. Place these wrapped slices into heavy-duty freezer-safe plastic bags. Properly wrapped, individual slices will maintain their quality for up to three weeks.
- Whole Cheesecake: To freeze an entire cheesecake, wrap it thoroughly first in several layers of plastic wrap, ensuring no air gaps. Then, wrap it again tightly in aluminum foil. A whole cheesecake can be frozen for four to six weeks.
Thawing Instructions: To thaw, transfer your frozen cheesecake (whole or slices) to the refrigerator overnight. If you’re in a rush for individual slices, they can be thawed on the kitchen counter at room temperature for about thirty minutes.
- Can I make cheesecake ahead of time?
Yes, and it’s highly recommended! Cheesecakes often taste even better the day after they are made, as the flavors have more time to meld and develop. You can comfortably prepare this chocolate cheesecake 3-5 days in advance, keeping it refrigerated in an airtight container until you’re ready to serve. This makes it a perfect dessert for entertaining, as it frees up your time on the day of your event. - How do I decorate chocolate cheesecake?
The possibilities for decorating your chocolate cheesecake are truly endless, allowing for both simple elegance and elaborate presentations. Personally, I love to keep it classic and chic with a dollop of freshly whipped cream, a sprinkle of crushed OREO cookies (tying back to the crust!), and a delicate drizzle of melted chocolate. For a touch of freshness and color, fresh berries like raspberries or strawberries, perhaps with a sprig of mint, work wonderfully. Chocolate-dipped strawberries also make a stunning and complementary garnish. Remember, this cheesecake is so inherently delicious that it truly doesn’t need any decoration at all if you prefer to let its rich beauty speak for itself! - Can I use light cream cheese?
While I always recommend full-fat cream cheese for the creamiest and richest texture, I have successfully substituted a lighter cream cheese option in this recipe without any major issues. If you choose to use light cream cheese, just be aware that the final texture might be slightly less dense and rich. Go for it if you prefer a lighter version! - What are good substitutes for cream cheese?
If you’re out of cream cheese or looking for a different flavor profile, several alternatives can work in a cheesecake, though they will alter the taste and texture somewhat:- Ricotta Cheese: Will result in a lighter, slightly grainier texture.
- Mascarpone Cheese: A richer, smoother, and more luxurious option, similar to cream cheese but with a higher fat content.
- Neufchâtel Cheese: A French cheese that is very similar to cream cheese but typically has about one-third less fat. It’s a great choice if you want to lighten the cheesecake without compromising too much on texture.
Each of these will lend a unique character to your cheesecake, so feel free to experiment!
- Troubleshooting Common Cheesecake Issues: While this recipe is designed to be foolproof, here are quick tips for common concerns:
- Cracks: Often caused by overbaking or uneven cooling. Running a knife around the edge immediately after baking and slow cooling (first on the counter, then fridge) helps. As mentioned, they’re easily disguised!
- Rubbery Texture: Usually a sign of overmixing the batter, especially after adding eggs. Mix just until combined.
- Undercooked Center: Ensure the center still has a slight jiggle, but isn’t liquid. If it seems too raw, continue baking in 5-minute increments.

Your Feedback Matters! Share Your Chocolate Bliss Cheesecake Experience
I genuinely love hearing from you! Whether this is your very first cheesecake or you’re adding it to your extensive baking repertoire, your experiences and thoughts on this recipe are invaluable. Please don’t hesitate to leave a comment below to share your triumphs, tips, or any questions you might have. Your feedback helps others in the baking community and makes this recipe even better!


Other Decadent Dessert Recipes You May Enjoy
- Mini Chocolate Cheesecakes
- Brownie Bottom Chocolate Cheesecake
- Easy No-Bake Cheesecake
- Chocolate Chip Cheesecake Bars
- No-Bake Lemon Cheesecake
12 servings
Chocolate Bliss Cheesecake
20 mins
1 hr
6 hrs
7 hrs
20 mins
Print Recipe
Equipment
-
Hand Mixer
-
9-inch Springform Pan
Ingredients
- 18 OREO cookies, finely crushed (approx. 1½ cups)
- 2 tablespoons unsalted butter, melted
- 3 packages (8 oz each) cream cheese, softened
- ¾ cup granulated sugar
- 1 teaspoon vanilla extract
- 1 package (8 squares) BAKER’S semi-sweet chocolate, melted and slightly cooled
- 3 large eggs
Instructions
- Preheat oven to 325° F (160°C).
- In a medium-sized bowl, combine the finely crushed OREO cookies and melted butter. Press this mixture firmly and evenly onto the bottom of a 9-inch springform pan.
- In a large bowl, beat the softened cream cheese, sugar, and vanilla with an electric mixer until well blended and smooth. Add the melted and slightly cooled semi-sweet chocolate and mix until just combined. Add eggs, one at a time, mixing on low speed just until each is blended into the batter. Do not overmix.
- Pour the cheesecake mixture over the prepared crust in the springform pan. Bake for 55-60 minutes, or until the edges are set but the center still has a slight jiggle.
- Remove from oven. Carefully run a thin knife around the rim of the pan to loosen the cake. Cool on the counter for 2 hours, then refrigerate for at least 4 hours (preferably overnight) before serving. Store any leftovers in the refrigerator.
Notes on Storage & Freezing
- Freezing Individual Slices: Ensure the cheesecake is completely cooled. Wrap each slice in foil or plastic, then place in heavy freezer-type plastic bags. Slices will last for three weeks. Thaw on the counter in thirty minutes or overnight in the refrigerator.
- Freezing a Whole Cheesecake: Wrap it well in plastic wrap, then in aluminum foil. It will last four to six weeks. Thaw overnight in the refrigerator.
- Advance Preparation: This cheesecake can be made 3-5 days ahead of time and stored refrigerated.
Nutrition Information (per serving)
Carbohydrates: 38g,
Protein: 7g,
Fat: 33g,
Saturated Fat: 18g,
Polyunsaturated Fat: 2g,
Monounsaturated Fat: 10g,
Trans Fat: 0.1g,
Cholesterol: 110mg,
Sodium: 265mg,
Potassium: 241mg,
Fiber: 2g,
Sugar: 29g,
Vitamin A: 897IU,
Calcium: 78mg,
Iron: 4mg
Nutrition information is automatically calculated and should only be used as an approximation.
Like this? Leave a comment below!
Originally published on August 7, 2012. Updated on April 24, 2020, and further enhanced for clarity and detail.