

The Ultimate Kit-Kat Cake: A Peanut Butter & Chocolate Extravaganza
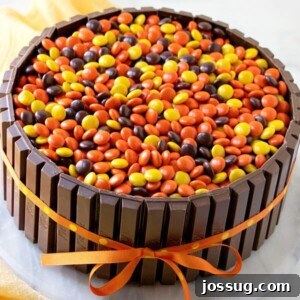
Prepare to become the star of every gathering with this absolutely spectacular Kit-Kat Cake! Imagine a moist, flavorful peanut butter cake, generously slathered with a rich, creamy chocolate-peanut butter frosting. Then, picture it beautifully encircled by crisp Kit-Kat bars, creating an edible fence of pure delight, and finally, brimming with a colorful cascade of Reese’s Pieces candy in its center. This isn’t just a cake; it’s a celebration in itself, a feast for both the eyes and the palate that promises to be the talk of all your get-togethers!
More Than Just a Dessert: A Personal Story of Sweet Success
Every great recipe often comes with a heartwarming story, and this Kit-Kat Cake is no exception. A few years ago, as my son, Elijah, was approaching his 16th birthday, I suggested creating this indulgent masterpiece. Known for its generous layers of flavor and candy, it was undeniably a “sugar overload” – but in the best possible way! To my surprise and delight, Elijah declared that he wanted to undertake the challenge of making this cake entirely by himself for his special day. It was a proud parent moment watching him meticulously follow the steps, with just a few guiding pointers from me.
He meticulously measured ingredients, carefully mixed batters, and patiently waited as the layers baked to golden perfection. Frosting the cake and arranging the Kit-Kats required a steady hand and keen eye, skills he developed right there in our kitchen. His dedication, precision, and the sheer joy he found in the process were truly inspiring. The entire house filled with the sweet aroma of peanut butter and chocolate, and the anticipation built with every step. The experience of him baking his own birthday cake made this recipe even more special in our family’s collection, teaching him valuable life skills and creating cherished memories that we still talk about today. This cake isn’t just about the ingredients; it’s about the effort, the love, and the joy of creating something truly spectacular.

What Makes a Kit-Kat Cake So Special?
At its core, a Kit-Kat Cake is a playful and highly customizable dessert designed to impress. It typically features a classic baked and frosted cake, innovatively adorned with a perimeter of iconic Kit-Kat candy bars. The magic truly happens when the center is filled with an assortment of smaller candies, creating a delightful surprise with every slice. The appeal lies in its ingenious blend of textures – the soft, tender cake, the creamy frosting, and the satisfying crunch of the Kit-Kats. It’s a dessert that perfectly marries a homemade feel with a whimsical, professional presentation, making it a standout at any gathering.
The visual impact of a Kit-Kat Cake is undeniable. The perfectly aligned chocolate bars create a striking border, drawing the eye to the vibrant candy-filled center. This makes it an ideal choice for any celebration where you want to serve a dessert that is both delicious and a conversation starter. Its versatility also means you can tailor it to any theme or preference, from swapping out cake flavors to experimenting with different candy fillings and frosting combinations. It’s a canvas for creativity, allowing you to personalize every aspect to suit your unique taste.
Our rendition takes this concept to new heights by using a semi-homemade approach for the cake, ensuring a perfect texture and flavor foundation without the extensive time commitment of a from-scratch recipe. We then elevate it with two homemade frostings: a rich peanut butter frosting and a decadent chocolate frosting, which are expertly combined to create a sensational chocolate-peanut butter buttercream. The entire creation is then adorned with Kit-Kat bars and a decorative ribbon, culminating in a festive centerpiece brimming with Reese’s Pieces candy. This cake is incredibly versatile and perfect for any celebratory occasion – from vibrant birthday parties and casual potlucks to lively summer cookouts or simply as an extraordinary sweet treat to brighten any day. For those who love to experiment, consider a rich chocolate cake with pure chocolate frosting, overflowing with colorful M&M candies for a different, yet equally delightful, variation! The possibilities are truly endless, limited only by your imagination and sweet tooth.

Mastering the Kit-Kat Cake: Essential Ingredients
Crafting this unforgettable Kit-Kat Cake requires a thoughtful selection of ingredients, ensuring each component contributes to its overall deliciousness. While we use a golden butter cake mix for convenience, the homemade frostings truly shine, bringing a rich, creamy depth of flavor. Here’s everything you’ll need to create this peanut butter and chocolate marvel. Quality ingredients are key, so opt for fresh butter, eggs, and your favorite creamy peanut butter to ensure the best possible flavor and texture.
Recipe for Kit-Kat Cake
FOR THE CAKE
The foundation of our cake is a semi-homemade golden butter cake, made extraordinary with the addition of creamy peanut butter, giving it a wonderfully moist texture and nutty flavor. Using a cake mix saves time while still allowing for a delicious, custom base.
- ½ cup creamy peanut butter (choose a smooth, classic variety for best results)
- ½ cup butter, softened (1 stick, unsalted preferred, at room temperature for optimal creaming)
- 4 large eggs (also at room temperature, for better emulsification with other ingredients)
- 1 box golden butter cake mix (18.25 oz., a good quality mix will yield a more delicious cake)
- ⅔ cup water (or milk, for an even richer cake)
FOR THE PEANUT BUTTER FROSTING
This luscious frosting is packed with real peanut butter flavor, providing a perfect counterpoint to the rich chocolate. Its smooth, creamy consistency makes it easy to spread and adds an incredible depth to the cake.
- 1 cup creamy peanut butter (ensure it’s smooth for a velvety frosting)
- ½ cup butter, softened (1 stick, essential for a light and fluffy frosting)
- 2 cups confectioners’ sugar (also known as powdered sugar, for sweetness and smooth texture)
- 3 – 4 tablespoons milk or water (start with 3, add more slowly to reach desired consistency)
- 2 teaspoons vanilla extract (pure vanilla extract enhances all flavors)
FOR THE CHOCOLATE FROSTING
A classic, rich chocolate buttercream that complements the peanut butter beautifully and provides a smooth, decadent canvas for the Kit-Kat bars. Unsweetened cocoa powder is key for deep chocolate flavor.
- ½ cup butter, softened (1 stick, for a rich and creamy base)
- ⅔ cup unsweetened cocoa powder (Dutch-processed cocoa offers a darker color and milder flavor)
- 3 cups confectioners’ sugar (sifted, if possible, to prevent lumps)
- ⅓ cup milk (whole milk often provides the best richness)
- 2 teaspoons vanilla extract (a must-have for balancing chocolate flavors)
TO ASSEMBLE
These are the iconic elements that transform a delicious cake into a show-stopping Kit-Kat masterpiece! They add both flavor, texture, and visual appeal.
- 11 – 12 full-sized Kit-Kat bars (ensure they are fresh and unbroken for a clean border)
- 1 bag Reese’s Pieces candy (17.25 oz, for that classic peanut butter and chocolate filling)
- Ribbon (for decoration and to help secure the Kit-Kats, choose a color that complements your occasion)

Step-by-Step Guide: How to Make a Kit-Kat Cake
Follow these detailed instructions to bring your sensational Kit-Kat Cake to life. Precision and patience are key for baking success, especially when assembling such an impressive dessert. Take your time, enjoy the process, and you’ll be rewarded with a truly spectacular cake.
How to make a Kit-Kat Cake
For the cake:
- Prepare your oven and pans: Preheat your oven to 325°F (160°C). This lower temperature helps the cake bake more evenly and prevents a domed top. Thoroughly grease and flour two 9-inch round cake pans. This crucial step prevents sticking and ensures your cakes release cleanly. You can also line the bottoms with parchment paper for extra assurance. Set the prepared pans aside.
- Cream the wet ingredients: In a large mixing bowl, using an electric mixer, cream together the creamy peanut butter and softened butter until the mixture is light, fluffy, and well combined. This process is vital as it incorporates air, contributing significantly to a tender and light cake texture. Scrape down the sides of the bowl often to ensure everything is fully mixed.
- Add eggs and cake mix: Incorporate the large eggs, one at a time, mixing gently after each addition until just combined. Be careful not to overmix at this stage. Next, add half of the golden butter cake mix and ⅓ cup of water. Mix on low speed until the dry ingredients are just incorporated into the wet mixture. Repeat with the remaining cake mix and the final ⅓ cup of water, mixing until the batter is smooth but not overbeaten. Remember, overmixing can develop gluten, which can lead to a tough and dense cake, so stop mixing as soon as the last streaks of flour disappear.
- Bake to perfection: Divide the batter evenly between your two prepared cake pans. Gently tap the pans on the counter a couple of times to release any large air bubbles. Bake for approximately 25 minutes, or until a wooden skewer or toothpick inserted into the center of the cakes comes out clean. If there are moist crumbs, bake for a few more minutes.
- Cool completely: This step is non-negotiable for a successful cake. Allow the cakes to cool in their pans for 10-15 minutes. This resting period helps them firm up slightly, making them less prone to breaking before you invert them onto a wire cooling rack to cool completely. It’s absolutely essential that the cakes are entirely cool before frosting to prevent the frosting from melting, sliding, and ruining your beautiful creation. This could take up to 1-2 hours.
For the Peanut Butter Frosting:
This rich and creamy frosting is a star in its own right, delivering that irresistible peanut butter flavor and providing a delightful contrast to the chocolate.
- Cream butter and peanut butter: In a medium bowl, cream the creamy peanut butter and softened butter together using an electric mixer until smooth and fluffy. This should take about 2-3 minutes on medium speed.
- Whip in dry and wet ingredients: Gradually add the confectioners’ sugar, starting with one cup at a time, mixing on low speed to avoid a sugar cloud. Once partially combined, add 3 tablespoons of milk and the vanilla extract. Mix on low speed for 1 minute until well combined. Increase the speed to medium and continue mixing until the frosting becomes light, fluffy, and perfectly spreadable – this could take another 2-3 minutes.
- Adjust consistency: If the frosting appears too thick or stiff, add the additional tablespoon of milk, one teaspoon at a time, mixing after each addition, until your desired smooth and creamy consistency is achieved. Be careful not to add too much at once.
For the Chocolate Frosting:
A decadent chocolate frosting that pairs perfectly with the peanut butter, adding depth and richness to the cake and providing a smooth base for the Kit-Kats.
- Cream the butter: In a medium bowl, cream the softened butter with an electric mixer until light and smooth, about 2 minutes.
- Incorporate cocoa and sugar: Gradually add the unsweetened cocoa powder and blend on low speed until it’s fully incorporated and no dry streaks remain. Then, gradually add the confectioners’ sugar, about a cup at a time, mixing on low. Once partially mixed, add the milk and vanilla extract. Mix on low speed for 1 minute.
- Whip until fluffy: Increase the mixer speed to medium and beat until the chocolate frosting is well combined, light, and wonderfully fluffy. This step can take 2-4 minutes, so be patient for the best results.
- Fine-tune consistency: If needed, add more confectioners’ sugar (for thicker frosting) or milk (for thinner frosting), 1 tablespoon at a time, until it reaches your preferred spreading consistency. The frosting should be firm enough to hold its shape but soft enough to spread easily.
To assemble:
This is where the magic happens! Turning individual components into a show-stopping dessert that will capture everyone’s attention.
- Layer the cake: Place one completely cooled cake layer on your chosen serving plate or cake stand. Use a generous amount, about ⅓ to ½ of the peanut butter frosting, and spread it evenly over the top, extending it close to the edge but not quite over. This inner layer will be a delightful surprise.
- Create the combined frosting: In a separate bowl, combine the remaining peanut butter frosting with all of the chocolate frosting. Mix well with a spatula or electric mixer on low speed until a uniform, delicious chocolate-peanut butter frosting is formed. This combination creates a harmonious flavor profile that is utterly irresistible.
- Frost the exterior: Use the combined chocolate-peanut butter frosting to generously coat the entire outside of the cake – both the top and the sides. Aim for a smooth and even layer, as this will be the adhesive for your Kit-Kat bars. You might not use all the frosting, so adjust as needed for desired coverage.
- Add the Kit-Kat border: This is the signature step! Carefully break each full-sized Kit-Kat bar in half along its natural break lines, creating two-piece sections. Begin placing these Kit-Kat sections vertically around the entire circumference of the frosted cake, pressing them gently but firmly into the frosting to secure them. Work your way around the cake, ensuring the Kit-Kats stand upright and snug against each other. As you reach the end, you may need to use a single-piece section to neatly fill any remaining gap for a seamless look.
- Secure with a ribbon: For both aesthetic appeal and to help keep the Kit-Kat bars securely in place, gently wrap a decorative ribbon (choose a color that matches your theme, like orange for Reese’s Pieces) around the perimeter of the cake, tying it into a lovely bow at the front. This adds a beautiful finishing touch and structural support.
- Fill with candy: Generously fill the top center of the cake with Reese’s Pieces candy, creating a vibrant, irresistible pool of chocolate and peanut butter delights. Spread them evenly for a balanced look.
- Chill and serve: Refrigerate the cake for at least 30 minutes to an hour until serving time. This allows the frosting to firm up and the Kit-Kats to set securely, making it much easier to slice cleanly. However, remove it from the refrigerator about 10-15 minutes prior to serving to allow the flavors to soften slightly and the cake to come to a more enjoyable temperature. Any leftovers should be stored promptly in an airtight container in the refrigerator to maintain freshness.

Kit-Kat Cake: Your Questions Answered
Here are some common questions and creative ideas to help you customize and enjoy your Kit-Kat Cake even more, ensuring it’s always a hit!
- What are some other creative fillings for my Kit-Kat Cake?
The possibilities are truly endless, allowing for incredible customization! Beyond Reese’s Pieces, you could fill the top with classic M&M’s candy (perhaps sorted by color for a themed event), crunchy Smarties, cool and refreshing Jr. Mints, fresh slices of vibrant strawberries or raspberries for a touch of fruitiness, crushed Oreo cookies for an added textural dimension, or even miniature chocolate chips. For a more sophisticated touch, consider toasted nuts or a drizzle of caramel. Let your imagination soar and choose candies or toppings that reflect your taste or the theme of your event!
- Can I use a homemade cake instead of a cake mix?
Absolutely! This recipe is incredibly adaptable, designed to be flexible for various baking preferences. While a golden butter cake mix offers convenience and consistent results, feel free to use your favorite from-scratch cake recipe if you prefer. Whether you opt for a rich chocolate cake, a classic vanilla bean, a festive funfetti, a tangy lemon, or even a spicy carrot cake, the homemade route opens up unlimited flavor possibilities to truly personalize your Kit-Kat Cake. Just ensure your chosen recipe yields two 9-inch round cake layers.
- How far in advance can I make this Kit-Kat Cake?
You can bake the cake layers up to 2-3 days in advance. Once cooled, wrap them tightly in plastic wrap and store at room temperature or freeze for longer storage. The frostings can also be made a day or two ahead and stored in the refrigerator; just bring them to room temperature and re-whip before use. The assembled cake is best enjoyed within 2-3 days, stored in the refrigerator. The Kit-Kats will soften slightly over time, but the cake will remain delicious.
- Can I make this cake in a different size?
Yes, you can! For a smaller cake, you might use two 8-inch pans, though you may have slightly thicker layers or need to adjust baking time. For a larger crowd, consider a sheet cake format and arrange the Kit-Kats along the perimeter, or make two smaller cakes. Adjust the number of Kit-Kat bars and candy filling accordingly based on the cake’s circumference and surface area.

Pro Tips for the Perfect Kit-Kat Cake
Achieving a truly show-stopping Kit-Kat Cake is easier with a few expert tips. These small details can make a big difference in the final presentation and taste of your dessert, elevating it from good to truly unforgettable.
- Room Temperature Ingredients: This is a golden rule in baking! Ensure your butter and eggs are at room temperature for both the cake batter and the frostings. This allows them to cream together properly, creating a smooth, emulsified batter and light, fluffy frostings that are easy to spread and incorporate air effectively.
- Don’t Overmix: When preparing the cake batter, mix only until ingredients are just combined. Overmixing develops gluten, which can lead to a tough, dense cake with an undesirable texture. Gentle mixing is key for a tender crumb.
- Cool Cakes Completely: This cannot be stressed enough! Attempting to frost warm cakes will result in melted, sliding frosting and a messy, collapsed finish. Allow ample time for your cake layers to cool entirely on a wire rack – ideally for at least 1-2 hours, or even longer if your kitchen is warm. You can even pop them in the refrigerator for 15-20 minutes once mostly cool to speed up the process.
- Even Kit-Kat Placement: For the neatest and most professional-looking border, ensure your Kit-Kats are broken evenly into two-piece sections. Press them gently but firmly into the freshly applied frosting around the sides of the cake. The frosting acts as a glue, holding them securely. Start with the flat side of the Kit-Kat against the cake for a cleaner look.
- Ribbon for Security and Style: The ribbon not only adds a beautiful decorative touch, giving your cake a polished finish, but it also serves a practical purpose: it helps hold the Kit-Kats securely in place, especially useful if you need to transport the cake. Choose a sturdy, food-safe ribbon.
- Chill Before Serving: Refrigerating the assembled cake for at least 30 minutes to an hour before serving allows the frosting to set and firm up, making clean slices much easier to achieve. However, remove it 10-15 minutes before serving to allow the flavors and frosting to soften slightly, ensuring a more enjoyable texture and taste experience.
- Get Creative with Fillings: While Reese’s Pieces are fantastic, don’t limit yourself! Feel free to experiment with other small candies, chopped nuts, or even fresh berries for a different flavor profile and visual appeal. Consider the colors and textures you’re adding to make your cake truly unique.
- Smooth Frosting Technique: For a clean Kit-Kat border, aim for a relatively smooth frosting layer around the sides of your cake. An offset spatula or a bench scraper can help you achieve a polished finish before applying the candy bars.
More Irresistible Recipes You’ll Love
If you enjoyed crafting this delightful Kit-Kat Cake, you might also like to explore these other fantastic recipes from our collection. They are sure to inspire your next baking or cooking adventure and bring joy to your kitchen!
- Snickerdoodle Cake: A cozy and comforting cake that captures the warm spice of classic snickerdoodle cookies, perfect with a cup of coffee.
- Lemon Lover’s Bundt Cake: Zesty and refreshing, this cake is bursting with bright citrus flavor, making it perfect for spring and summer gatherings.
- Soft and Easy Buttery Rolls: A savory addition to any meal, these rolls are incredibly tender, simple to make, and disappear quickly from the dinner table.
- Instant Pot Mashed Potatoes: Achieve perfectly creamy, fluffy mashed potatoes in a fraction of the time with this clever and convenient recipe.
- Cornbread Pancakes: A unique and delicious twist on breakfast, combining the best of savory cornbread with light and fluffy pancakes – a true southern-inspired delight.
Kit-Kat Cake Recipe Card
Author: Jamie Sherman
Description: This Kit-Kat Cake will be the talk of all of your get-togethers! A peanut butter cake, frosted with chocolate-peanut butter frosting, surrounded by Kit-Kat bars, and filled with Reese’s Pieces candy.
Servings: 18 servings
Prep Time: 1 hour
Cook Time: 25 minutes
Inactive Time: 30 minutes (cooling time is crucial!)
Total Time: 1 hour 55 minutes
Equipment
- Large mixing bowls
- Electric hand mixer
- Cake stand or serving plate
- Two 9-inch round cake pans
- Wire cooling rack
- Spatulas (offset spatula recommended for frosting)
Ingredients
For the cake:
- ½ cup creamy peanut butter
- ½ cup butter, softened (1 stick)
- 4 large eggs
- 1 box golden butter cake mix (18.25 oz.)
- ⅔ cup water
For the Peanut Butter Frosting:
- 1 cup creamy peanut butter
- ½ cup butter, softened (1 stick)
- 2 cups confectioners’ sugar (powdered sugar)
- 3 – 4 tablespoons milk or water
- 2 teaspoons vanilla extract
For the Chocolate Frosting:
- ½ cup butter, softened (1 stick)
- ⅔ cup unsweetened cocoa powder
- 3 cups confectioners’ sugar
- ⅓ cup milk
- 2 teaspoons vanilla extract
To assemble:
- 11 – 12 full-sized Kit-Kat bars (approximately 22-24 two-piece sections)
- 1 bag Reese’s Pieces candy (17.25 oz)
- Ribbon (about 1.5-2 inches wide, enough to wrap around a 9-inch cake)
Instructions
For the cake:
- Preheat oven to 325° F. Grease and flour two 9-inch cake pans. Set aside.
- In a large bowl, cream the peanut butter and butter with an electric mixer until light and fluffy. Add eggs, one at a time, mixing until just combined after each. Add half of the cake mix and ⅓ cup of water; mix on low speed until just combined. Add remaining cake mix and remaining ⅓ cup of water; mix until just combined, being careful not to overmix.
- Pour batter evenly into the prepared cake pans. Bake for 25 minutes or until a toothpick inserted into the center comes out clean.
- Allow cakes to cool in the pans for 10-15 minutes, then invert onto a wire cooling rack to cool completely before frosting.
For the Peanut Butter Frosting:
- In a medium bowl, cream the peanut butter and softened butter with an electric mixer until smooth.
- Gradually add confectioners’ sugar, 3 tablespoons milk, and vanilla extract. Mix on low speed for 1 minute, then increase to medium and beat until well combined and fluffy.
- Add the additional tablespoon of milk, 1 teaspoon at a time, if the frosting needs to be thinned out to a spreadable consistency.
For the Chocolate Frosting:
- In a medium bowl, cream the softened butter with an electric mixer until smooth.
- Add cocoa powder and blend on low speed until fully incorporated. Add confectioners’ sugar, milk, and vanilla extract. Mix on low for 1 minute.
- Increase speed to medium and beat until the frosting is well combined and fluffy.
- Add more sugar (for thicker) or milk (for thinner), 1 tablespoon at a time, if necessary to reach desired consistency.
To assemble:
- Place one cooled cake layer on a serving plate. Top with ⅓-½ of the peanut butter frosting, spreading it close to, but not over the edge.
- Combine the remaining peanut butter frosting with all of the chocolate frosting in a separate bowl and mix well to create a uniform chocolate-peanut butter frosting.
- Generously coat the outside of the cake – top and sides – with this combined Chocolate-Peanut Butter Frosting, creating a smooth surface.
- Carefully break each Kit-Kat bar in half along its lines into 2-piece sections. Starting at one point, place the Kit-Kat sections vertically around the entire edge of the cake, pressing them gently into the frosting. Fill any remaining gaps with single-piece sections if needed.
- Wrap the decorative ribbon around the Kit-Kats and tie it into a bow to help secure them and add a finishing touch.
- Fill the top center of the cake with Reese’s Pieces candy.
- Refrigerate the cake until serving time (at least 30 minutes). Remove from refrigerator about 10-15 minutes prior to serving for optimal texture and flavor. Refrigerate any leftovers in an airtight container.
Notes
- M&M’s make a great substitution for the Reese’s Pieces candy, offering a colorful and equally delicious alternative.
- Other suitable fillings include Smarties, Jr. Mints, fresh berries, or crushed Oreo cookies for added texture.
- Ensure all butter and eggs are at room temperature for optimal mixing and a smoother batter/frosting.
Nutrition Information
Nutrition information is automatically calculated based on the ingredients listed and assumes 18 servings. It should only be used as an approximation and can vary based on specific brands and exact measurements.
- Serving Size: 1 slice
- Calories: 795 kcal
- Carbohydrates: 97 g
- Protein: 13 g
- Fat: 42 g
- Saturated Fat: 22 g
- Polyunsaturated Fat: 4 g
- Monounsaturated Fat: 13 g
- Trans Fat: 1 g
- Cholesterol: 86 mg
- Sodium: 390 mg
- Potassium: 371 mg
- Fiber: 4 g
- Sugar: 75 g
- Vitamin A: 565 IU
- Calcium: 146 mg
- Iron: 2 mg
Enjoyed this recipe? Share your experience!
We absolutely love hearing from you! If you tried your hand at making this amazing Kit-Kat Cake, please take a moment to leave a comment below and share your experience. Your feedback, tips, and photos not only make our day but also inspire and help other aspiring bakers in our community. Happy baking!
Originally published on August 7, 2012. Updated on June 8, 2020.