
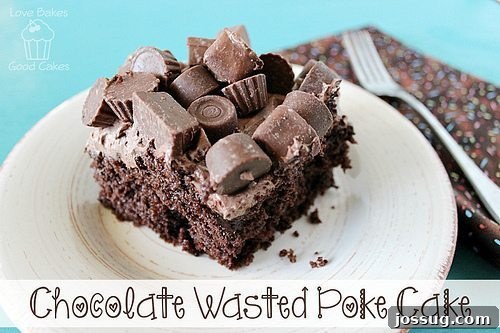
Prepare to delight your taste buds with a dessert that screams pure indulgence: our Decadent Chocolate Poke Cake! This isn’t just any cake; it’s a symphony of chocolate goodness in every single bite. Imagine a rich, moist chocolate cake, generously doused with velvety chocolate pudding and syrup, then crowned with fluffy whipped cream and a generous scattering of your favorite chocolate candies. It’s an easy-to-make, show-stopping dessert that’s guaranteed to satisfy even the most intense chocolate cravings and impress any crowd.
Decadent Chocolate Poke Cake: Your Ultimate Guide to a Rich and Easy Dessert
If you’re anything like us, you have a special place in your heart for poke cakes. These ingenious desserts are a baker’s secret weapon, transforming a simple cake into an extraordinarily moist and flavorful treat. The magic lies in poking holes into the freshly baked cake, allowing a delicious liquid (like pudding, condensed milk, or fruit purees) to seep in, creating an incredibly tender texture and infusing it with deep flavor. This particular chocolate poke cake takes that concept to a new level, layering chocolate upon chocolate for an utterly decadent experience that’s surprisingly simple to achieve.
The Playful Inspiration Behind This Chocolate Indulgence
This delightful dessert, affectionately known as the “Chocolate Wasted Poke Cake” by many, draws its playful moniker from a memorable scene in the movie “Grown-Ups.” For fans of Adam Sandler, Kevin James, Chris Rock, and the rest of the hilarious cast, the phrase “chocolate wasted” immediately brings a smile to their faces, evoking a sense of over-the-top, joyous indulgence. While we promise our cake won’t leave you quite “wasted,” it certainly delivers an intensely chocolatey experience that’s impossible to resist. It’s a fun nod that adds a touch of whimsy to an already fantastic dessert, making it a perfect conversation starter at any gathering.
The beauty of this chocolate poke cake recipe is its incredible depth of flavor achieved with minimal effort. We start with a moist chocolate cake base, elevate it with two layers of rich chocolate pudding, and drizzle it with a smooth chocolate topping. The grand finale is a fluffy Cool Whip frosting, studded with an assortment of your favorite chocolate candies. Each component builds upon the last, creating a complex yet harmonious flavor profile that chocolate lovers dream of. Whether you’re a seasoned baker or just starting, this recipe is designed for success, promising a spectacular dessert every time.
Why This Chocolate Poke Cake Will Become Your Favorite
- Unbelievably Moist: The secret to an exceptionally moist cake lies in the “poking” technique. By creating small holes, we allow the rich chocolate pudding and syrup to soak deep into the cake, ensuring every bite is tender and flavorful, never dry.
- Rich Chocolate Flavor: This recipe is a triple threat of chocolate! From the chocolate cake base to the two layers of chocolate pudding and the chocolate syrup, it delivers a profound, satisfying cocoa experience that true chocolate connoisseurs will adore.
- Effortless Preparation: Utilizing a boxed cake mix and instant pudding makes this recipe incredibly accessible. It’s a perfect option for busy weeknights, last-minute parties, or when you simply want a delicious dessert without spending hours in the kitchen.
- Crowd-Pleasing Perfection: The visual appeal, combined with its irresistible taste, makes this poke cake an instant hit at any potluck, family dinner, or special occasion. It’s a guaranteed showstopper that always disappears quickly!
- Customizable Fun: While we love the classic chocolate candy topping, this cake is a blank canvas for creativity. Feel free to experiment with different candies, drizzles, or even fresh fruits to make it your own.
A Friendly Tip for Toppings!
While an assortment of mini candy bars, peanut butter cups, and Rolos work wonderfully as toppings, exercise caution with M&M’s! In my experience, adding them too early can lead to unsightly disintegrated pools of color. For the best presentation and crunch, I highly recommend sprinkling M&M’s over the cake just before serving. Trust me, waiting until serving time will make all the difference! Enjoy the vibrant colors and satisfying crunch they bring to your beautiful dessert.
This beloved recipe has been previously featured at several wonderful food blogs:
- Ms. enPlace
- Mother’s Niche
- Happy and Blessed Home
- The NY Melrose Family
Decadent Chocolate Poke Cake Recipe
Chocolate Wasted Poke Cake
Rate Recipe
Print Recipe
Want to save this recipe for later?
We’ll email this post to you, so you can easily come back to it!
Ingredients
- 1 package chocolate cake mix, 15.25 oz.
- Ingredients listed on box to make cake (eggs, oil, water, etc.)
- 1 box instant chocolate pudding mix, 3.9 oz. (for cake infusion)
- 3 cups milk, divided
- ½ cup chocolate syrup/topping
- 1 box instant chocolate pudding mix, 3.9 oz. (for frosting)
- 1 container Cool Whip, thawed, 8 oz.
- Assorted chocolate candies (for topping)
Instructions
- Bake the chocolate cake according to the package directions, using a 9×13-inch baking pan. Allow the cake to cool slightly for about 10-15 minutes after removing from the oven; it should still be warm.
- While the cake is cooling, prepare the first layer of pudding. In a medium bowl, whisk together one box of instant chocolate pudding mix with 2 cups of milk until well combined and slightly thickened. Using the round end of a wooden spoon or a skewer, poke holes all over the warm cake, making sure not to go all the way to the bottom. Slowly and carefully pour the pudding mixture over the entire cake, trying to fill each hole.
- Next, prepare the chocolate topping. If your chocolate syrup is too thick, briefly microwave it (without the lid) for about 20-30 seconds until it pours easily. Drizzle the warmed chocolate syrup evenly over the pudding-soaked cake. Set the cake aside to cool completely to room temperature, then transfer it to the refrigerator for at least 1 hour to chill thoroughly.
- Once the cake is fully chilled, prepare the second layer of pudding frosting. In another medium bowl, combine the second instant chocolate pudding mix with the remaining 1 cup of milk. Whisk until smooth and slightly thickened. Gently fold in the thawed Cool Whip until no streaks remain and the mixture is light and airy.
- Spread this creamy pudding and Cool Whip mixture evenly over the top of the chilled cake. Finally, generously sprinkle your assorted chocolate candies over the frosting for a festive and delicious finish.
- Refrigerate the cake for at least 4 hours (or preferably overnight) to allow all the flavors to meld and the cake to set perfectly. Store any leftover cake covered in the refrigerator.
Notes
- Think of this recipe as a fantastic starting point. Once you master the basic poke cake technique, the possibilities are endless! Experiment with different cake flavors, pudding mixes, and toppings to create your own signature variations. Lemon cake with vanilla pudding and lemon zest, or strawberry cake with white chocolate pudding, are just a few ideas!
- For an extra touch of richness, you can use homemade whipped cream instead of Cool Whip. Just be sure to stabilize it for better shelf life.
- Consider adding a layer of caramel or peanut butter sauce before the Cool Whip for an even more complex flavor profile.
Nutrition
Carbohydrates: 28g,
Protein: 3g,
Fat: 5g,
Saturated Fat: 2g,
Polyunsaturated Fat: 1g,
Monounsaturated Fat: 1g,
Cholesterol: 4mg,
Sodium: 286mg,
Potassium: 148mg,
Fiber: 1g,
Sugar: 19g,
Vitamin A: 57IU,
Vitamin C: 0.01mg,
Calcium: 73mg,
Iron: 1mg
Nutrition information is an approximation based on standard calculations and may vary.
Tips for the Perfect Chocolate Poke Cake
Achieving poke cake perfection is simpler than you might think! Here are some expert tips to ensure your Decadent Chocolate Poke Cake turns out moist, flavorful, and absolutely irresistible every time:
- Don’t Skimp on the Poking: The more holes, the more delicious pudding and syrup can seep into your cake. Use the round end of a wooden spoon or a skewer to create generous, evenly spaced holes across the entire cake surface. Be gentle, but thorough!
- Temperature Matters: Pouring the first pudding mixture over a warm cake (not piping hot, but definitely not cold) allows it to absorb more effectively. The warmth helps the cake fibers relax, making them more receptive to the liquid infusion.
- Chill Time is Crucial: Patience is a virtue, especially with poke cakes! Refrigerating the cake for at least 4 hours (or ideally overnight) is essential. This allows the pudding to fully set and penetrate the cake, creating that signature moist, melt-in-your-mouth texture. It also ensures the cake holds its shape better when sliced.
- Quality of Ingredients: While this recipe uses a cake mix and instant pudding for convenience, opting for high-quality brands can make a noticeable difference in flavor. For an extra rich chocolate flavor, consider adding a teaspoon of espresso powder to your chocolate cake mix.
- Topping Creativity: Don’t limit yourself to just chocolate candies! Get creative with your toppings. Consider a drizzle of caramel sauce, a sprinkle of toasted coconut, crushed nuts (pecans, walnuts), mini chocolate chips, or even fresh raspberries for a touch of tartness to balance the sweetness.
- Evenly Spread Layers: When spreading the pudding and Cool Whip layers, use an offset spatula for a smooth, even finish. This not only makes the cake look professional but also ensures a balanced flavor in every bite.
- Storage: Always keep your poke cake covered and refrigerated. It will stay fresh and delicious for 3-4 days, making it an excellent make-ahead dessert for parties or meal prep.
Frequently Asked Questions About Chocolate Poke Cakes
- Can I use a homemade cake and pudding instead of boxed mixes?
- Absolutely! While the recipe is designed for convenience with boxed mixes, you can certainly elevate it by using your favorite homemade chocolate cake recipe and a rich homemade chocolate pudding. Just ensure your homemade pudding has a similar consistency to instant pudding when prepared, so it can properly soak into the cake.
- What if I don’t have a wooden spoon to poke holes?
- No problem! Any similar tool with a round end will work. A chopstick, the handle of a whisk, or even a thick skewer can be used to create the holes. The goal is to make holes large enough for the pudding to seep in effectively.
- How long does chocolate poke cake last in the refrigerator?
- When stored properly in an airtight container in the refrigerator, this chocolate poke cake will stay fresh and delicious for 3-4 days. It’s often even better the second day, as the flavors have more time to meld and the cake becomes even more moist.
- Can I freeze poke cake?
- Yes, you can freeze poke cake! For best results, freeze the cake without the candy topping. Wrap the cake tightly in plastic wrap, then in aluminum foil. It can be frozen for up to 1-2 months. Thaw overnight in the refrigerator before adding fresh toppings and serving.
- Are there any dairy-free alternatives for this recipe?
- Yes, you can often adapt this recipe for dairy-free diets. Use a dairy-free chocolate cake mix (check ingredients carefully), substitute regular milk with plant-based milk (like almond or oat milk) for the pudding, and use a dairy-free whipped topping instead of Cool Whip. Ensure your chocolate syrup and candies are also dairy-free.
More Decadent Desserts You’ll Love
- Chocolate Banana Bars: A delightful fusion of rich chocolate and sweet bananas in a moist, chewy bar.
- Patriotic Jello Poke Cake: A vibrant, fruity, and refreshing dessert perfect for summer celebrations.
- Pumpkin Spice Poke Cake: Embrace autumn flavors with this cozy and spiced poke cake, infused with warm pumpkin goodness.
- Loaded Bacon and Cheese Fries: (Not a dessert, but a crowd-pleasing savory treat for those who enjoy variety!) Crispy fries loaded with cheese and savory bacon.
- Waffle Cherry Brownie Poke Cake: A creative twist combining dense brownie, sweet cherries, and the fun of waffles in a poke cake format.
Loved this recipe? Share your thoughts below!
Your feedback helps us create more delicious content.
Originally published on October 11, 2013. Updated on April 24, 2021, and further enhanced for clarity and comprehensive details on May 15, 2024.