

Embark on a culinary journey to the heart of Italy with this incredible Frosted Italian Anise Bread. This beloved sweet bread, cherished for generations, offers a delicate balance of fluffy texture and a subtle, aromatic anise flavor that might just change your mind about this unique spice. Whether you’re honoring timeless traditions during Easter or Christmas, or simply looking to create a truly special treat for your loved ones, this recipe promises a delightful experience from start to finish. Prepare to fall in love with a classic that’s as beautiful to behold as it is delicious to eat!

Frosted Italian Anise Bread: A Timeless Sweet Tradition
Frosted Italian Anise Bread, often known simply as Italian Easter Bread, is more than just a recipe; it’s a cherished tradition passed down through families, embodying the warmth and celebratory spirit of Italian culture. This exquisite bread, with its distinctive licorice-like aroma and tender crumb, is a true testament to the simple yet profound joy of homemade baking. While it holds a special place at holiday tables, particularly during Easter and Christmas, its irresistible charm makes it a perfect addition to any gathering throughout the year.
Many people associate anise with black licorice, and for some, that’s a flavor they tend to avoid. However, this recipe introduces anise in such a gentle and harmonious way that it transforms perceptions. The delicate hint of anise extract beautifully complements the sweetness and richness of the bread, creating a sophisticated flavor profile that is both comforting and intriguing. It’s an ideal recipe for introducing skeptics to the delightful world of anise, proving that this spice can be incredibly versatile and appealing when balanced correctly.
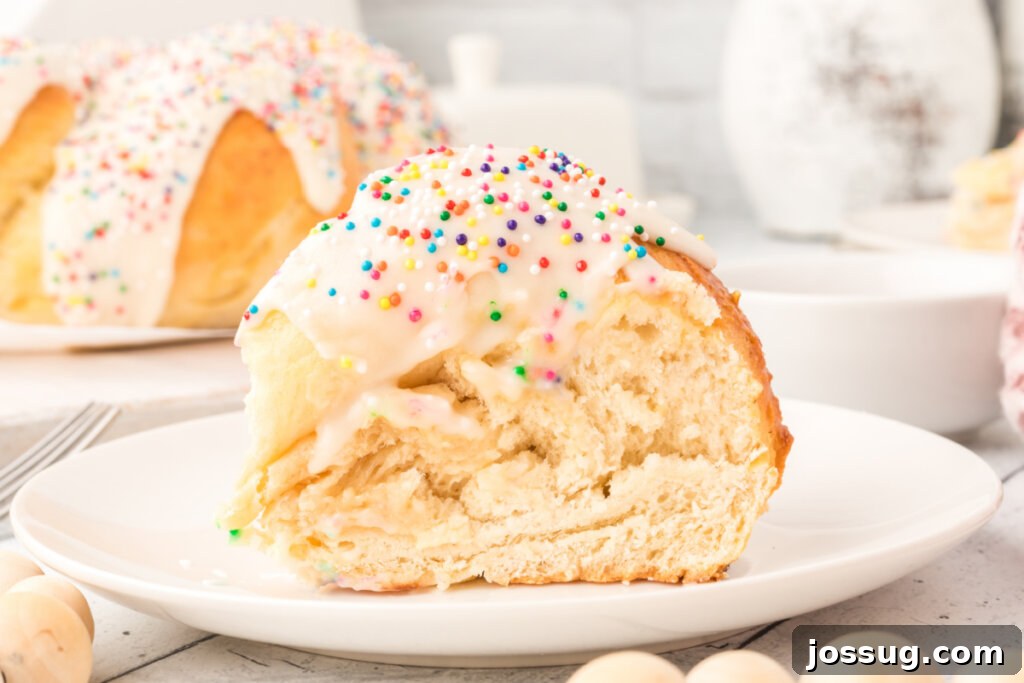
Imagine the aroma filling your kitchen as this beautiful braided loaf bakes to golden perfection. The anticipation builds as it cools, waiting to be adorned with a sweet, anise-infused glaze and vibrant sprinkles. Serving this bread is an event in itself, a moment to share a piece of heritage and a truly special treat with family and friends. Don’t limit this culinary masterpiece to just the holidays; its comforting flavor and festive appearance make any day feel like a celebration. Trust us, every step of the process is worth the effort when you taste the incredible result – a truly memorable Frosted Italian Anise Bread!

The Enchanting Flavor of Anise: Demystified
Anise, derived from the seeds of the Pimpinella anisum plant, is a spice with a rich history and a distinctive flavor often compared to licorice or fennel. This unique taste comes from anethole, the main aromatic compound found in anise. While its strong flavor can sometimes be polarizing, in the context of this traditional Italian sweet bread, anise extract plays a starring role in creating a wonderfully balanced and aromatic experience.
Unlike some anise-heavy confections, this recipe utilizes anise extract in a way that provides a gentle, sweet perfume rather than an overpowering burst. The extract integrates seamlessly into the dough and frosting, infusing every bite with its warm, slightly spicy, and sweet notes. This thoughtful inclusion makes the Frosted Italian Anise Bread approachable even for those who typically shy away from licorice flavors, often converting skeptics into admirers. It’s about discovering the subtle elegance of anise, allowing its warmth to enhance the overall sweetness and fluffiness of the bread without dominating the palate.
The beauty of this bread lies in its ability to evoke nostalgia and create new traditions simultaneously. Its distinct flavor profile sets it apart from other sweet breads, offering a unique sensory experience that becomes synonymous with comfort and festivity. So, if you’ve been hesitant to try anise-flavored treats, this recipe is your perfect introduction. Prepare to be pleasantly surprised by how much you enjoy this captivating spice!
Frosted Italian Anise Bread: Key Ingredients & Smart Substitutions
Crafting the perfect Italian Anise Bread begins with understanding the role of each ingredient. This recipe relies on a combination of common baking staples and a few star components that bring its unique character to life. Here’s a closer look at what you’ll need and how you can adapt if necessary:
Ingredients
For the Bread:
- All-Purpose Flour: The foundation of our tender bread. While all-purpose flour works beautifully, you can experiment with a portion of bread flour for a chewier texture or a mix with cake flour for an even softer crumb. Ensure it’s accurately measured.
- White Granulated Sugar: Adds sweetness and aids in yeast activation, contributing to the bread’s golden crust.
- Salt: A crucial ingredient that balances the sweetness and enhances all the other flavors in the bread. Don’t skip it!
- Rapid-Rise Yeast: Essential for a quick and efficient rise, giving our bread its fluffy texture. Ensure your yeast is fresh and active for the best results. If using active dry yeast, you may need to proof it in warm milk first.
- Milk: Provides moisture and richness to the dough, contributing to its tender texture. Whole milk is recommended for the best flavor, but 2% will also work.
- Anise Extract: The star flavor! This extract delivers the distinct licorice-like taste that defines this Italian sweet bread. For a milder flavor, you can slightly reduce the amount.
- Eggs: Two eggs are incorporated into the dough, adding richness, structure, and a beautiful yellow hue. Eggs also contribute to the bread’s moisture and softness.
- Butter: Adds incredible flavor and tenderness to the dough. Using unsalted butter allows you to control the salt content in the recipe. Make sure it’s at room temperature for easy incorporation.
For the Egg Wash:
- 1 Large Egg (beaten): Brushed over the uncooked loaf, this creates a beautiful, shiny, golden-brown crust during baking.
For the Frosting:
- Milk: Used to achieve the perfect drizzle consistency for the frosting. Any type of milk will work here.
- Light Corn Syrup: Contributes to the frosting’s smooth texture and prevents crystallization, giving it a lovely sheen.
- Butter (melted): Adds richness and flavor to the frosting, making it smooth and spreadable.
- Powdered Sugar (Confectioners’ Sugar): Forms the base of our sweet, smooth glaze. Sift it to avoid lumps.
- Anise Extract: Infuses the frosting with another layer of that delightful licorice taste, enhancing the overall anise experience.
- Vanilla Extract: A touch of vanilla beautifully rounds out and enhances the other flavors in the frosting, adding depth and warmth.
Additional Ingredients:
- Multi-colored Nonpareils: These delightful sprinkles add a festive touch and a playful crunch, making the bread visually appealing, especially for holidays. Feel free to use other sprinkles or leave them off if preferred.

How to Make Italian Easter Bread: A Step-by-Step Guide
Making this beautiful Italian Anise Bread is a rewarding process. Follow these detailed steps to achieve a perfectly fluffy, aromatic loaf:
- Prepare Your Dry Ingredients and Preheat: In a generously-sized mixing bowl, combine 1 cup of the all-purpose flour with the granulated sugar, salt, and rapid-rise yeast. Whisk these dry ingredients thoroughly to ensure even distribution, especially of the yeast. This preliminary mix sets the stage for optimal dough development. While you work on the dough, preheat your oven to 350°F (175°C) so it’s ready when the bread has finished rising.
- Warm the Wet Ingredients: In a small saucepan, gently warm the milk and anise extract over low heat. Use a kitchen thermometer to ensure the mixture reaches approximately 110°F (43°C). This temperature is crucial: it’s warm enough to activate the yeast without killing it, ensuring a good rise. Avoid overheating, as excessively hot liquid will kill the yeast, preventing the bread from rising.
- Combine and Knead the Dough: Create a shallow well in the center of your dry flour mixture. Carefully pour the warm milk and anise mixture into this well. Using your clean hand or a sturdy spoon, gently swirl the liquid into the flour, gradually incorporating the dry ingredients. Once partially combined, add the softened butter and eggs, one at a time, mixing after each addition until fully incorporated. Gradually add the remaining flour, mixing until the dough begins to come together into a shaggy ball.
- Develop the Dough’s Structure: Transfer the dough onto a lightly floured work surface. Knead the dough vigorously for about 8 minutes. This kneading process is vital for developing the gluten, which gives the bread its characteristic elasticity and chewiness. You’ll know it’s ready when the dough becomes soft, smooth, and elastic. Once kneaded, cover the dough with a clean, damp cloth and let it rest for 10 minutes. This rest period allows the gluten to relax, making the dough easier to handle.
- Shape Your Festive Loaf: After resting, divide the dough into two equal halves. On your floured surface, roll each half into a smooth ball. Then, gently shape each ball into a long rope, aiming for pieces approximately 1.5 inches thick and 18-20 inches long. To create the traditional twisted loaf, pinch the two top ends of the ropes firmly together. Loosely twist the two pieces over each other, creating a braided effect. Once twisted, bring the two bottom ends together and pinch them securely to form a ring. Ensure all ends are well sealed to maintain the shape during rising and baking.
- Allow the Dough to Rise: Lightly grease a baking sheet. Carefully transfer your shaped dough ring onto the prepared sheet. Cover the loaf again with a damp towel, creating a warm, humid environment that encourages rising. Let the dough rise in a warm, draft-free spot until it has visibly doubled in size. This usually takes about 1 hour, but rising times can vary depending on your kitchen’s temperature and humidity. A properly risen dough will be light and airy.
- Bake to Golden Perfection: Just before baking, gently brush the surface of the risen loaf with the beaten egg wash. This egg wash contributes to the beautiful golden-brown color and a slightly glossy finish. Carefully place the baking sheet into your preheated 350°F (175°C) oven. Bake for 20-25 minutes, or until the bread is golden brown and sounds hollow when tapped on the bottom. Keep a close eye on it during the last few minutes to prevent over-browning.
- Cool and Frost: Once baked, immediately transfer the golden loaf to a wire rack to cool completely. Cooling on a rack allows air circulation, preventing the bottom from becoming soggy. While the bread cools, prepare the frosting: In a small bowl, whisk together the milk, light corn syrup, melted butter, powdered sugar, anise extract, and vanilla extract until smooth. Once the bread is completely cool, generously drizzle the frosting over the top, letting it drip down the sides. Immediately sprinkle with your colorful nonpareils before the frosting sets. Allow the frosting to fully set, which may take a little time, before slicing and serving. This ensures a clean cut and a beautiful presentation.

Pro Tips for a Perfect Frosted Italian Anise Bread
Achieving bakery-quality Italian Anise Bread at home is simpler with these expert tips:
- Don’t Rush the Kneading: Eight minutes might seem like a long time for kneading, but it’s essential for developing the gluten structure. A well-kneaded dough will be smooth, elastic, and will rise beautifully, resulting in a light and airy bread. If using a stand mixer with a dough hook, this process is even easier, typically taking 5-7 minutes on medium speed.
- The Warmth of the Rise: Yeast thrives in a warm, draft-free environment. If your kitchen is cool, try placing the covered dough in a slightly warmed (but turned off!) oven, or near a sunny window. You can also place the bowl in a larger bowl of warm water. Proper proofing is key to a fluffy texture.
- Mastering the Anise Flavor: Anise extract provides a clean, consistent flavor. If you’re an anise enthusiast, you can certainly add a pinch of ground anise seed (about 1/2 teaspoon) to the dry ingredients for a more pronounced flavor and visual flecks. For those who are hesitant, stick to the extract as written; it provides a lovely, subtle aroma without being overwhelming.
- For a Striking Braid: When shaping the ropes, aim for even thickness to ensure uniform baking. When twisting, try to keep the twists relatively loose. This allows the dough to expand freely during rising and baking, resulting in a more distinct and airy braid.
- Cool Completely Before Frosting: It’s tempting to frost warm bread, but patience is a virtue here! Applying frosting to warm bread will cause it to melt and run off, creating a messy result. Allow the loaf to cool completely on a wire rack to ensure the frosting sets beautifully.
- Storage Suggestions: This bread is best enjoyed fresh on the day it’s made. However, leftovers can be stored at room temperature in an airtight container for up to 3-4 days. For longer storage, you can freeze individual slices (without frosting, if possible, or frosted once set) for up to 2-3 months. Thaw at room temperature and refresh briefly in a warm oven if desired.
Frosted Italian Anise Bread: FAQs
This recipe yields one beautiful, generous loaf of Frosted Italian Anise Bread. Depending on how thinly you slice it, you can expect to get approximately 10-12 delightful servings, making it perfect for sharing with family and friends.
While this recipe does require a bit of time and patience, the hands-on work is quite manageable. You’ll spend about 15 minutes on active ingredient preparation and mixing, and the baking time is approximately 20-25 minutes. However, you’ll also need to factor in about 10 minutes for the initial dough rest and roughly 1 hour for the dough to rise until doubled. So, from start to finish, plan for about 2 hours, including resting and rising times. It’s a fantastic project for a leisurely afternoon, especially when preparing for a special occasion!
This recipe primarily relies on anise extract for its clean and consistent flavor delivery, which makes it very approachable. However, if you are a true anise aficionado and desire a more intense or textured flavor, you can certainly add about 1/2 to 1 teaspoon of whole or ground anise seed to your dry ingredients along with the flour. This will provide a more robust anise presence and a delightful visual speckled effect. Feel free to customize the anise intensity to your preference!
To maintain its freshness, store any leftover Frosted Italian Anise Bread in an airtight container at room temperature. It will remain delicious for about 3-4 days. If you need to store it longer, you can freeze the bread (either whole or sliced, preferably without frosting, or after the frosting has fully set) in a freezer-safe bag or container for up to 2-3 months. Thaw at room temperature and, if desired, warm briefly in a low oven to restore some of its fresh-baked softness.
Absolutely! Both a bread machine and a stand mixer can make the dough preparation process significantly easier. For a bread machine, simply add the ingredients according to your manufacturer’s specific instructions for the “dough” setting. Once the dough cycle is complete, remove the dough and proceed with shaping, rising, and baking as directed in steps 5-12 of this recipe. If using a stand mixer, use the dough hook attachment to mix and knead the dough on medium speed for about 5-7 minutes until it’s smooth and elastic, then continue with the rest of the recipe as instructed.
Explore More Italian & Holiday Recipes
If you’ve fallen in love with the flavors of Italy or are seeking more delightful holiday treats, be sure to try these other fantastic recipes:
- Italian Anise Cookies: Another classic way to enjoy the aromatic notes of anise, perfect for your holiday cookie platter.
- Italian Ricotta Cookies: Incredibly soft and moist, these cookies are a beloved Italian dessert that’s simple to make and always a crowd-pleaser.
- Peanut Butter Easter Eggs: A fun and festive treat, these homemade peanut butter eggs are a delightful addition to any Easter basket or celebration.
- Italian Herb Baked Meatballs: For a savory twist, these flavorful meatballs are baked to perfection and infused with classic Italian herbs, ideal for a hearty meal.
- Soft Italian Breadsticks: Perfect for dipping into your favorite sauce or accompanying a pasta dish, these soft breadsticks are a versatile and delicious staple.

★
★
★
★
12
servings
Frosted Italian Anise Bread
Jamie Sherman
15
20
1
25
2
Pin Recipe
Rate This Recipe
Print Recipe
Equipment
-
Wire Cooling Rack
-
Silicone Basting Brush
-
Baking Sheets
-
Bench Scraper
-
Pot and Pan Set
-
Large Mixing Bowl
-
Measuring Cups and Spoons
Ingredients
For the Bread
- 3 cups all-purpose flour, divided
- ¼ cup granulated sugar
- 1 teaspoon salt
- 1 package rapid rise yeast, 0.25 ounce
- ⅔ cup milk
- 1 teaspoon anise extract
- 2 tablespoons butter, at room temperature
- 2 large eggs
- 1 large egg, beaten (for brushing over the loaf)
For the Frosting
- 2 tablespoons milk
- 1 tablespoon light corn syrup
- 1 tablespoon butter, melted
- 1 ½ cups powdered sugar
- ½ teaspoon anise extract
- ½ teaspoon vanilla extract
Additional Ingredients
- multi-colored nonpareils
Instructions
-
Mix 1 cup of flour with sugar, salt, and yeast in a large bowl, and whisk together.
-
Place the milk and anise extract into a small saucepan over low heat and warm it to about 110°F.
-
Make a well in the center of the flour mixture with your hand, and pour in the milk mixture. With your clean hand, swirl it in a circular motion to combine the flour mixture with the milk mixture. Mix in the butter and eggs, one at a time, then mix in the remaining flour until the dough begins to pull together.
-
Turn the dough out onto a floured work surface, and knead until soft but elastic, about 8 minutes. Cover with a damp cloth, and let the dough rest for 10 minutes.
-
Cut the dough into halves.
-
On floured work surface, roll each half into a ball, then shape the balls into 2 long pieces, about 1-1/2 inches thick and between 18 to 20 inches long. Pinch the 2 top ends together and loosely twist the pieces to form a twisted loaf; pinch the bottom ends together, and form the twist into a ring, and pinch the ends together.
-
Grease a baking sheet, then lay the loaf onto the prepared sheet and cover with a damp towel/ Let the loaf rise until doubled, about 1 hour.
-
Preheat the oven to 350°F.
-
Brush the loaf with the beaten egg.
-
Bake the loaf until golden, 20 to 25 minutes. Watch closely towards the end of the baking time so that the bread does not begin to burn.
-
Transfer the loaf to a wire rack immediately after baking to cool completely.
-
Once the bread has cooled, combine all of the frosting ingredients in a small bowl and drizzle the frosting over the cooled loaf. Immediately sprinkle with the nonpareils. Allow the frosting to set completely before slicing and serving.
Notes
- If you prefer, make this into a straight twisted/braided loaf instead of a ring, and tuck the two ends underneath the loaf for a more traditional bread shape.
- You can also prepare this dough using a bread machine on the “dough” setting. Follow your manufacturer’s directions for adding ingredients to the loaf pan. Once the dough cycle is complete, remove the dough and continue with the recipe as directed from the shaping step onwards.
- Should you prefer to use your stand mixer for the mixing and kneading phases, feel free! Use the dough hook attachment and mix on medium speed until the dough is smooth and elastic (approximately 5-7 minutes). Then, proceed with the rest of the recipe as directed.
- For a stronger flavor focus, you can use all anise extract or all vanilla extract for the frosting, depending on your preference. The chosen flavor will be more pronounced.
Nutrition
Nutrition information is automatically calculated, so should only be used as an approximation.