
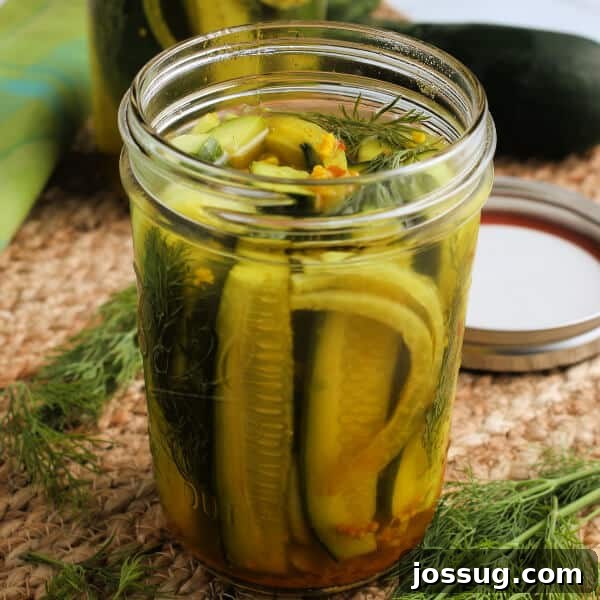
Are you craving that irresistible crunch and tangy flavor of a perfectly pickled cucumber? Imagine having fresh, homemade dill pickles ready in your refrigerator without the complicated process of traditional canning. This easy refrigerator pickles recipe is your answer!
Effortless Refrigerator Pickles: Your Guide to Quick & Crunchy Homemade Dill Pickles
There’s nothing quite like the crisp, tangy bite of a homemade pickle. While store-bought options are convenient, making your own refrigerator pickles allows for a level of freshness and customizable flavor that truly elevates this classic condiment. Whether you enjoy them alongside a juicy burger, tucked into a hearty sandwich, or simply as a refreshing snack, these quick pickles are guaranteed to be a delightful addition to your culinary repertoire. Best of all? This recipe requires absolutely no special canning equipment or intimidating water baths – just a few simple ingredients, lidded jars, and your trusty refrigerator.
Many home cooks shy away from making their own pickles, intimidated by the thought of sterilization and the lengthy canning process. However, refrigerator pickles are a game-changer. They offer all the deliciousness of traditional pickles with minimal effort. This method focuses on a quick brine that infuses cucumbers with incredible flavor, and then the pickles are stored in the fridge, where they continue to develop their zesty taste over time. It’s truly the easiest way to enjoy the superior taste of homemade.
Why Choose Homemade Refrigerator Pickles?
While we all appreciate the convenience of store-bought pickles, there’s a unique satisfaction and undeniable flavor advantage that comes with homemade versions. Here’s why diving into the world of refrigerator pickles is a fantastic idea:
- Unmatched Freshness: You control the quality of your ingredients, ensuring crisp, fresh cucumbers and vibrant herbs go into every jar. This translates to a brighter, more natural flavor profile than many commercial varieties.
- Customizable Flavor: This is arguably the biggest benefit! Want more garlic? Add it. Prefer a spicier kick? Increase the red pepper flakes. Obsessed with dill? Pile it in! With homemade pickles, you can fine-tune the saltiness, sweetness, and spice levels to perfectly suit your palate.
- No Canning Required: For many, the thought of canning is daunting, involving special equipment, precise temperatures, and a significant time commitment. Refrigerator pickles eliminate all that. You simply prepare your brine, pack your jars, and chill. It’s a low-stress approach that yields delicious results.
- Cost-Effective: Especially when cucumbers are in season, making your own pickles can be more economical than regularly purchasing gourmet brands. Plus, you get to enjoy the bounty of your garden or local farmer’s market.
- Sense of Accomplishment: There’s a distinct pleasure in serving something you’ve made from scratch. Your guests will be impressed, and you’ll feel proud of your culinary creation!
- Healthy & Wholesome: By making your own, you avoid artificial preservatives, colors, and excessive sodium often found in store-bought options. You know exactly what’s in your food.
Understanding Refrigerator Pickles
Refrigerator pickles, sometimes called “quick pickles,” are a simple, non-fermented pickle type that doesn’t involve traditional canning methods. Instead of using heat processing to create a shelf-stable product, these pickles rely on a vinegar-based brine and cold storage in the refrigerator to preserve the cucumbers and infuse them with flavor. The high acidity of the vinegar prevents spoilage, while the chilling process maintains their crisp texture. They’re typically ready to eat within 24 hours and stay fresh in the fridge for several weeks, if not months. This makes them perfect for beginner picklers or anyone looking for a fast and easy way to enjoy homemade pickled vegetables.

Essential Ingredients for Perfect Refrigerator Pickles
Crafting delicious refrigerator pickles starts with a selection of fresh ingredients and aromatic spices. Here’s what you’ll need for this tried-and-true recipe, along with a little insight into why each component is important:
- Small Cucumbers (Pickling Cucumbers): The star of the show! Smaller, firm cucumbers with thin skins are ideal for pickling as they tend to stay crunchier. Look for varieties like Kirby or Persian cucumbers. Ensure they are fresh and free of blemishes.
- Small Sweet Onion: Adds a subtle sweetness and a mild onion flavor that complements the tanginess of the brine without overpowering the dill.
- Fresh Dill Weed Sprigs: Essential for that classic dill pickle flavor. Fresh dill provides a bright, herbaceous note that dried dill simply can’t replicate. Don’t skimp on this!
- Apple Cider Vinegar: Contributes a slightly fruity, mellow acidity to the brine. It’s less harsh than white vinegar, adding complexity.
- White Vinegar (Distilled): Provides a clean, sharp acidity that is crucial for preservation and the overall tangy profile of the pickles. Using a combination of vinegars creates a well-rounded flavor.
- Water: Dilutes the vinegar, ensuring the brine isn’t overly strong and allowing the flavors to meld beautifully.
- Granulated Sugar: Balances the acidity of the vinegar, preventing the pickles from being too sour. You can adjust the amount to your preference for a sweeter or tarter pickle.
- Garlic Cloves: A must-have for classic dill pickles. Fresh garlic infuses the brine with its pungent, savory notes. Minced garlic maximizes flavor distribution.
- Salt (Pickling or Kosher): Crucial for flavor and crispness. Avoid iodized table salt, as it can make the brine cloudy and affect the texture of the pickles. Pickling salt or kosher salt without anti-caking agents is best.
- Crushed Red Pepper Flakes: Adds a hint of warmth and a subtle spicy kick. Adjust the amount based on your desired heat level.
- Mustard Seeds: A traditional pickling spice that offers a subtle peppery, earthy, and pungent flavor, contributing to the overall complexity.
- Whole Peppercorns: Provides a gentle, aromatic heat and depth of flavor.
- Ground Turmeric: Primarily used for its vibrant yellow color, which gives the pickles an appealing golden hue. It also offers a very subtle earthy flavor.

Tools for Making Refrigerator Pickles
Making refrigerator pickles doesn’t require specialized canning equipment, but having a few basic kitchen tools will make the process smooth and enjoyable:
- Wide-Mouth Pint Jars with Lids: These are ideal for easy packing and storage. Two pint-sized jars are perfect for this recipe. Ensure they are clean and have tight-fitting lids.
- Small Saucepan: For preparing the flavorful pickling brine.
- Measuring Cups and Spoons: For accurate ingredient measurements, ensuring consistent results every time.
- Cutting Board and Knife: To prepare your cucumbers and onions with precision.
- Liquid Measuring Cup: For safely pouring the warm brine into the packed jars.
Step-by-Step Guide: How to Make Refrigerator Pickles
Follow these simple instructions to create your own batch of irresistible crunchy dill pickles:
- Prepare Your Jars: Begin by thoroughly washing two wide-mouth pint jars and their lids with warm, soapy water. Rinse them meticulously to remove any soap residue. Set them upside down on a clean towel or drying rack to air dry completely. Ensuring your jars are clean is an important step for food safety and preventing spoilage.
- Prepare the Vegetables: Wash and thoroughly dry your small cucumbers. For an optimal pickle experience, slice them lengthwise into evenly sized spears. This ensures they absorb the brine uniformly and fit neatly into your jars. Next, halve your small sweet onion and slice it very thinly. The thin slices will distribute their flavor well throughout the pickles.
- Pack the Jars: Carefully and evenly pack the prepared cucumber spears, fresh dill sprigs, and thinly sliced onions into each of your dried pint jars. Arrange them as tightly as possible without crushing the vegetables. Leave about a ½-inch (1.25 cm) space from the very top of the jar to allow for the brine and proper lid sealing.
- Simmer the Brine: In a small saucepan, combine both apple cider vinegar and white vinegar, water, granulated sugar, minced garlic, salt, crushed red pepper flakes, mustard seeds, whole peppercorns, and ground turmeric. Place the saucepan over high heat and bring the mixture to a rolling boil, stirring occasionally. Once boiling, reduce the heat to low and allow the brine to simmer gently for about 3-5 minutes, or until the salt and sugar have completely dissolved.
- Cool and Fill: Remove the saucepan from the heat and let the brine cool down until it is warm to the touch but no longer scalding hot. Carefully pour the warm brine over the packed cucumbers and onions in the jars, ensuring all vegetables are submerged. Again, remember to leave approximately a ½-inch (1.25 cm) headspace at the top of each jar.
- Seal and Cool: Place the lids tightly on top of the filled jars and screw them on securely. Allow the jars to cool down completely to room temperature on your countertop. This can take several hours.
- Refrigerate and Enjoy: Once the jars have reached room temperature, transfer them to your refrigerator. For the best flavor, allow the pickles to chill and meld with the brine for at least 24 hours before tasting. The flavor will continue to develop and improve over the next few days. While they are ready to eat within a day, they become truly fantastic after a few days of chilling!

Refrigerator Pickles: Frequently Asked Questions
Here are some common questions and helpful answers to ensure your pickling adventure is a success:
How long will these pickles last in the fridge?
These homemade refrigerator pickles will generally last for about two months in your refrigerator. Keep in mind that while they remain safe to eat, their crispness tends to diminish over time. For the absolute best crunch and freshest flavor, we recommend enjoying them within the first few weeks.
Does dried dill work as well as fresh?
For this recipe, fresh dill weed sprigs are highly recommended. Fresh dill provides a brighter, more vibrant, and authentic dill pickle flavor that dried dill often lacks. If you must use dried dill in a pinch, you’ll need significantly less (about 1/3 the amount of fresh) and the flavor will be less pronounced.
Can I substitute another sweetener for granulated sugar?
Yes, you can certainly experiment with other sweeteners! Honey, maple syrup, or even a sugar substitute can be used to balance the acidity of the brine. Start with a smaller amount and adjust to your taste, as different sweeteners have varying levels of sweetness and can subtly alter the overall flavor profile.
Should I use seedless or seeded cucumbers?
Both seedless and seeded cucumbers can work well for refrigerator pickles. If your seeded cucumbers have very large, prominent seeds, you might consider scooping out some of the seeds before slicing, as this can sometimes contribute to a softer pickle texture. However, for most small pickling cucumbers, leaving the seeds in is perfectly fine.
My pickles aren’t as crunchy as I’d like. What went wrong?
Several factors can affect pickle crispness:
- Cucumber Freshness: Start with very fresh, firm cucumbers. Older, softer cucumbers will result in softer pickles.
- Cucumber Type: Pickling varieties (like Kirby or Persian) are best for crunch.
- Blossom End: The blossom end of a cucumber contains enzymes that can make pickles soft. If you’re using whole cucumbers, trim off about 1/16 inch from both ends.
- Brine Temperature: Pouring hot brine over cucumbers can sometimes soften them. Cooling the brine to warm (not hot) helps maintain crispness.
- Soaking: Some people like to soak cucumbers in ice water for a few hours before pickling to enhance crispness.
Can I add other vegetables to this brine?
Absolutely! This versatile brine recipe works wonderfully for other vegetables too. Try pickling green beans, carrots, bell peppers, or even cauliflower florets. Just ensure they are cut to an appropriate size and packed tightly into the jars.
Customize Your Refrigerator Pickles
While the recipe above provides a fantastic classic dill pickle, don’t hesitate to get creative and tailor the flavors to your liking! Here are some exciting additions and variations to try:
- Spicy Kick: For those who love heat, add a few slices of fresh jalapeño or serrano peppers to the jars along with the cucumbers. A dash of Sriracha sauce in the brine can also provide a fiery depth.
- Herbaceous Notes: Experiment with different herbs like bay leaves (for a warm, aromatic touch), sprigs of fresh thyme, or even a touch of oregano.
- Complex Spices: Introduce whole coriander seeds for a citrusy, earthy note, or a pinch of dill seed for an intensified dill flavor. A star anise pod can add a subtle licorice aroma.
- Sweet & Spicy: Increase the sugar slightly for a sweeter pickle, or add a pinch of red pepper flakes for a sweet and spicy profile.
- Garlic Lover’s Delight: If you’re a true garlic enthusiast, don’t hesitate to add an extra clove or two to each jar.
- Onion Varieties: While sweet onion is recommended, red onion can add a beautiful color and a slightly sharper flavor.
Serving Your Homemade Refrigerator Pickles
Now that you’ve mastered the art of making homemade refrigerator pickles, it’s time to enjoy them! Their versatility makes them a perfect accompaniment to a wide variety of meals and snacks:
- Classic Accompaniment: The absolute best friend to any burger, hot dog, or sandwich. Their tangy crunch cuts through rich flavors beautifully.
- Snack Attack: Grab a spear straight from the jar for a refreshing, low-calorie snack.
- Salad Boost: Chop them up and add them to potato salad, tuna salad, chicken salad, or a simple green salad for an extra layer of flavor and texture.
- Charcuterie Boards: A small bowl of homemade pickles is a vibrant and zesty addition to any cheese or charcuterie platter.
- Cocktail Garnish: Use a pickle spear as a garnish for a Bloody Mary or other savory cocktails.
- In Dips: Finely chop them and mix into creamy dips for a tangy zest.
- Fried Pickles: Batter and fry them for a delicious appetizer!
Average Rating: 4.50 from 10 votes
Servings: 8 servings
Refrigerator Pickles
By Jamie Sherman
Have you ever made Refrigerator Pickles? Try this recipe for Refrigerator Pickles – it is easy and delicious – no canning required.
Prep Time: 10 mins
Cook Time: 15 mins
Additional Time: 1 day (for chilling)
Total Time: 1 day 25 mins
Save | Pin | Rate | Print
Equipment
- Measuring cups and spoons
- Cutting board
- Knife
- Small saucepan
- Wide-mouth pint jars with lids (8 oz. Mason Jars)
Ingredients
- 1 pound small cucumbers, sliced evenly
- 1 small sweet onion, thinly sliced
- 2 – 4 fresh dill weed sprigs
- ½ cup apple cider vinegar
- ½ cup white vinegar
- ½ cup water
- ¼ cup granulated sugar
- 2 cloves garlic, minced
- 1 ½ teaspoons salt
- ½ teaspoon crushed red pepper flakes
- ½ teaspoon mustard seeds
- ¼ teaspoon whole peppercorns
- ¼ teaspoon ground turmeric
Instructions
- Take 2 wide-mouth pint jars with lids and thoroughly wash them with warm soapy water. Rinse them well. Set them aside to dry completely.
- Clean and dry off cucumbers. Slice them the long way into evenly cut spears. Halve and thinly slice the onions.
- Evenly pack the jars with cucumbers, dill sprigs, and onions, leaving about a ½ inch space at the top of the jars. (Be sure to pack them as tightly as you can!)
- In a small saucepan over high heat, bring the following to a boil: both kinds of vinegar, water, sugar, garlic, salt, and all other seasonings. Reduce heat and allow the brine to simmer until salt and sugar dissolve.
- Cool brine down to warm and fill jars, still keeping the ½ inch space at the top of the jars.
- Place the lids on the top of the jars and screw them on so they are sealed very tightly. Allow jars to cool down to room temperature.
- Place the jars in the refrigerator for 24 hours. They will improve with flavor over time but will be ready to eat within a day!
Notes
- Make sure to slice your cucumbers in a way they will fit into the jars easily.
- For extra crispness, you can soak the sliced cucumbers in ice water for 30 minutes before packing them into jars.
Nutrition
Serving: 1 spear, Calories: 53kcal, Carbohydrates: 11g, Protein: 1g, Fat: 0.2g, Saturated Fat: 0.02g, Polyunsaturated Fat: 0.03g, Monounsaturated Fat: 0.1g, Sodium: 445mg, Potassium: 150mg, Fiber: 1g, Sugar: 9g, Vitamin A: 98IU, Vitamin C: 4mg, Calcium: 23mg, Iron: 0.4mg
Nutrition information is automatically calculated, so should only be used as an approximation.

Your Journey to Perfect Pickles Begins Here!
There you have it – a simple, delicious, and incredibly satisfying recipe for homemade refrigerator pickles. No complex canning process, no special equipment, just pure, unadulterated pickle perfection that you can create right in your own kitchen. The fresh, tangy, and crunchy results are far superior to anything you’ll find in a store, and the ability to customize the flavors means you can truly make them your own.
So, why wait? Gather your ingredients, prepare your jars, and embark on this delightful pickling adventure. Once you taste your first homemade refrigerator pickle, you’ll wonder why you didn’t start sooner. They’re perfect for elevating everyday meals, enhancing backyard barbecues, or simply enjoying as a guilt-free snack.
We’d love to hear about your experience! Did you try any exciting variations? How did your pickles turn out? Share your thoughts and questions in the comments below – we always love hearing from our community!
Other Recipes You May Enjoy
If you loved making these pickles, you might enjoy these other delicious recipes:
- Dill Pickle Wrap Dip
- White Castle Casserole
- Rouladen Burger
- Big Mac Salad
- Kool Aid Pickles
